Integrations
Integrations are connections to external MQTT brokers, Pub/Sub messaging suppliers or other third-party web services. These connections can then be used to trigger Workflows and/or output messages from your application.
Viewing Integrations

View your application's integrations under Integrations in the Application menu bar. Icons next to each integration indicate its last known connection status.
Click an integration's name in the list to view its configuration, make edits or view workflows associated with the integration.
Creating an Integration

From the Integrations list page, click "Add Integration" in the top right corner. This will take you to a page where you will be able to choose which type of integration to create.

Integration Settings

Every integration requires a name, and you may also disable the integration by unchecking the Enabled checkbox. When editing an existing integration, you may also check its connection status in the top right corner of the page.
Beyond that, the configuration for an integration varies depending on the type.
Note: Several integration configuration properties support templating from your application globals. Inputs that accept templates are labeled as such.

Amazon SQS
An Amazon Simple Queue Service (SQS) integration allows you to trigger workflows whenever an integration receives an Amazon SQS message.

SQS Queue URL
- SQS Queue URL Template: The URL associated with the SQS queue.
Amazon SQS Authentication
Choose a method for authenticating the Amazon SQS integration using the Credential Method dropdown:
- Service Credential: If selected, this field is required:
- Credential Name: A dropdown list of your AWS Service Credentials.
- Enter Connection Info: If selected, these fields are required:
- AWS Region Template: The AWS Region where the SQS queue is located.
- AWS Access Key ID Template: An AWS Access Key ID that Losant will use alongside the AWS Secret Access Key to authenticate the connection to your SQS queue. You can create an Access Key for an IAM user in the AWS IAM console.
- AWS Secret Access Key Template: An AWS Secret Access Key that Losant will use alongside the AWS Access Key ID to establish the SQS connection.
Note: In order to properly connect with Losant, the IAM policy associated with the IAM user must have sqs:SendMessage and sqs:ReceiveMessage permissions.
Azure Event Hubs
An Azure Event Hub integration allows you to trigger workflows by consuming events published to an Azure Event Hub.

Azure Event Hubs Authentication
Choose a method for authenticating the Azure Event Hub integration using the Credential Method dropdown:
- Service Credential: If selected, these fields are required:
- Credential Name: A dropdown list of your Azure Service Credentials.
- Host Name Template: The fully qualified domain name (FQDN) of the namespace that your Event Hub resides in.
- Connection String: If selected, this field is required:
- Connection String Template: This is a connection string scoped to either an event hub namespace, or to a specific event hub. You can create an event hub connection string through the Azure Portal. In order to properly connect with Losant, the access policy associated with the connection string must have
SendandListenpermissions.
- Connection String Template: This is a connection string scoped to either an event hub namespace, or to a specific event hub. You can create an event hub connection string through the Azure Portal. In order to properly connect with Losant, the access policy associated with the connection string must have
Event Hub Config
- Event Hub Name Template: This is the name of the event hub to consume from and send to.
- Consumer Group Template: This is the name of the consumer group used to consume and send events.
Partition Keys (Optional)
- Partition Keys: This allows you to filter the events that this integration receives. Only events with a specified partition key will fire an Azure Event Hub Trigger. If no partition keys are configured, the integration will receive all events consumed from the event hub.
Note: It is not always recommended to use partition keys for your event hub implementation. Read more about partition keys and their recommended usage from Azure.
Google Pub/Sub
A Google Cloud Pub/Sub integration allows you to trigger workflows off of messages going through your messaging middleware. It also allows you to publish to the service via a workflow.

Google Pub/Sub Authentication
Choose a method for authenticating the Google Pub/Sub integration using the Credential Method dropdown:
- Service Credential: If selected, this field is required:
- Credential Name: A dropdown list of your GCP Service Credentials.
- Account Key JSON: If selected, these fields are required:
- Account Key JSON Template: A JSON object in the format of a Service Account Key. There are a few validation rules on the object's properties; it is recommended you copy the key directly from your Google Cloud account and paste it here. Note: This is only required if Account Key JSON is selected as a Credential Method. The key should have the Pub/Sub Editor role - roles/pubsub.editor - because it needs to be able to create subscriptions.
Project ID (Optional)
- Project ID Template: This represents the ID of your Google Cloud Platform project. If left blank, the integration will use the default Project ID associated with your provided service account key.
Topics
- Topics: Enter one or more topics to subscribe to. Any workflows triggering off of this integration will fire anytime a message is received on one of these topics. The topic you enter is the trailing part of the topic name from Google. For example, if your topic name is
projects/myProjectName/topics/myTopic, you would entermyTopic. Note: It is not necessary to subscribe to a topic in order to publish to it in a Google Pub/Sub Output Node.
MQTT
Setting up an MQTT broker integration allows you to trigger workflows whenever the integration receives a message; it also allows you to publish messages to the broker via a workflow.

- Protocol, Host Template and Port Template: Select
mqtt://,mqtts://,ws://orwss://for the protocol. The port number will update to the default port for each of these protocols, but you may change this if necessary. For the host, enter the domain at which the broker is accessed. - Protocol Version: Choose whether to connect the integration over MQTT v3.1.1 (default) or MQTT v5. Some brokers will allow either option, but for most MQTT integrations, you must choose a specific version depending on what the broker supports.
- Clean Session: Leave this checked to clear any previous session when connecting to the broker; uncheck it to pick up previous session data if it exists.
- Client ID Template: Enter a client ID if the broker requires one. If you leave this field blank, Losant will automatically assign a client ID, which you may change at any time.
- Authentication Method: There are three options to choose from, some of which require additional fields to be entered ...
- None: Provide no authentication information to the broker.
- Username and password: Authenticate with the broker by providing a Username Template and a Password Template. This is the default authentication method.
- Certificate: If a secure protocol is selected (
mqtts://orwss://), you can choose to authenticate by certificate, in which case you must provide a Private Key Template and a Certificate Template.
- Topics: Enter one or more topics to subscribe to from this broker. Any workflows triggering off of this integration will fire anytime a message is received on one of these topics.
- It is not necessary to subscribe to a topic in order to publish to it in an MQTT Output Node.
- Wildcard MQTT Topics are supported for MQTT integrations with Losant.
- CA Certificate Template: If you selected a secure protocol for the connection, you will have the option to enter your own CA certificate. If you use a self-signed certificate or a certificate from a non-standard authority, you must provide the CA certificate from the authority so Losant can properly verify the connection.
Particle
Particle now recommends using webhooks to send data to third-party services. While this integration is still supported, we suggest setting up a new Losant HTTP webhook for ingesting data from Particle.
See our How To Integrate Particle and Losant guide for more information.
A Particle integration allows you to trigger workflows off of events published from your Particle devices. It also allows you to call a Particle device function and receive a response via a workflow.

- Access Token Template: This is the access token that Losant will use to communicate with Particle. You can get your access token from the "Settings" view in the Particle IDE.
- Event Names: Enter one or more event names to subscribe to. Any workflows triggering off of this integration will fire anytime a message is received on one of these topics. If you append a
*, the event name will be treated as a prefix match - so any events that start with the given name will match. In addition, an event name of just*will subscribe to all events. Note: It is not necessary to subscribe to an event in order to perform device function calls.
The other three fields in the Particle integration configuration are optional:
- Device Name or ID Template
- Product Slug or ID Template
- Org Slug or ID Template
These correspond to the deviceId, product, and org parameters on the underlying Particle Event Stream API endpoint. When the deviceId field is left blank, Losant will use the special keyword mine when connecting to Particle, to ensure that Losant only subscribes to events for your devices (as opposed to subscribing to the public events of any Particle device).
For a step-by-step walkthrough, please read the article How to Integrate Particle with Losant.
WebSocket
A WebSocket integration allows you to establish a client connection to any server that supports WebSockets. You can then trigger workflows on messages received from the server and send messages to the server over the open connection.

Configuration
- URL Template: Provide the full URL to the WebSocket server you wish to connect to, including the full resource path and any query parameters. This must start with either
ws://orwss://, and it must be a valid URL. - Disable SSL Verification: If checked, the WebSocket server's SSL certificate will not be verified against known certificate authorities, and you will not be able to provide a custom CA certificate for verification.
Authentication
Choose a method for authenticating the WebSocket request, if necessary.
- None: Select this option if the WebSocket client connection does not require authentication.
- Select Service Credential ...: If authentication is necessary, Losant strongly recommends storing the information in an HTTP Service Credential. Select this option to use a credential, and then select the Credential Name to use for authentication. (Note: Only HTTP credentials whose URIs begin with
ws://orwss://can be selected.) - Username and password: If the WebSocket server uses basic authentication, select this option and then enter the Username Template (optional) and Password Template (required) to connect to the server.
- Private Key and Certificate: Select this option if the server authenticates using a client certificate. When selected, you must enter your client's Private Key Template and Certificate Template.
If authentication is accomplished through an HTTP header - such as with a Bearer Token - then select the "None" option here and provide the appropriate header in the Headers section. (However, Losant recommends storing that information in an HTTP Service Credential for security.)
Headers
Optionally, provide additional HTTP headers to include in the WebSocket integration request as Name / Value pairs. Note that you may not include headers that conflict with your chosen authentication method; for example, you may not provide an "Authorization" header when selecting the "Username and password" authentication option, as that method already makes use of the "Authorization" header.
CA Certificate
If the WebSocket server uses a self-signed certificate or a certificate from a non-standard certificate authority, you must provide a CA Certificate Template so that Losant can authenticate the request.
Note: This section will not display if the Disable SSL Verification checkbox is checked.
Using Integrations
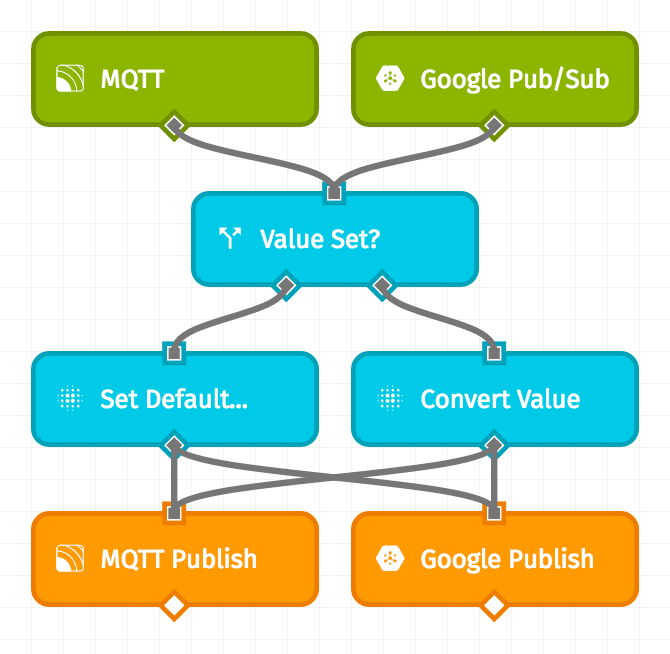
Setting up integrations serves two purposes: triggering workflows and outputting messages. Both of these goals are accomplished using Losant's workflow engine. For more information, check out your integration's corresponding nodes:
Messages received from your integrations count against your payload limits, so make sure to only subscribe to topics that you are actually using.
Integrations are throttled to 20 messages per second.
Associated Workflows
From an integration's "Workflows" tab, you will see a list of all workflows and custom nodes with at least one trigger or one output (publish) node targeting this integration.
The list does not include ...
- Any output node that uses a string template to reference the integration by ID, as opposed to selecting the integration directly.
- Any output node that publishes to the same integration without actually using the integration itself as the authentication mechanism. (For example, if an output node authenticates by service credential, that node will not cause its workflow to appear in the list even if the same credential is used to authenticate the integration.)
From this table, you may also generate a starter workflow for this integration, which includes a trigger and debug output catching all inbound messages.
Deleting an Integration
An integration can be deleted by clicking the "Delete" icon next to any item on the list page, or by clicking the "Delete" button in the footer of an integration's edit page.

When deleting an integration, you also have the option of deleting any workflows triggered by that integration. Note that this action deletes any workflow with a trigger matching this integration. If you wish to save your workflows and change out their triggers, or if the workflows are triggered by multiple conditions and you wish to retain them, you should leave this option unchecked.
Examples
Was this page helpful?
Still looking for help? You can also search the Losant Forums or submit your question there.