Workflows
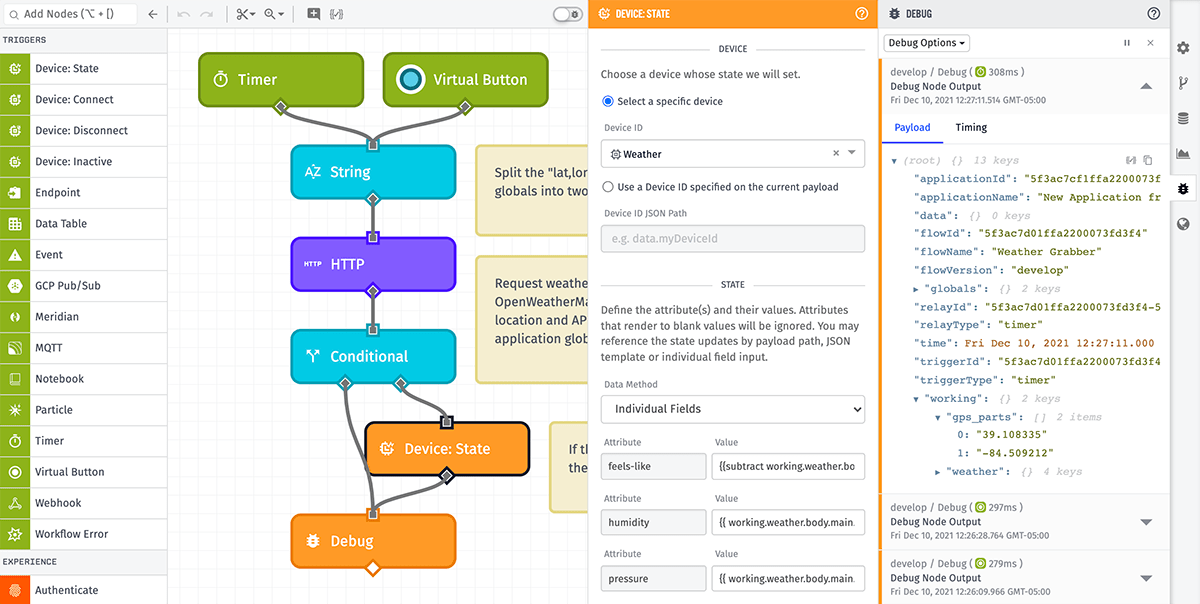
Workflows are the primary way for your devices to communicate with each other and other services. Workflows allow you to (for example) trigger email notifications, create events, send device commands and more. Workflows are, in essence, the brains of your connected solution.
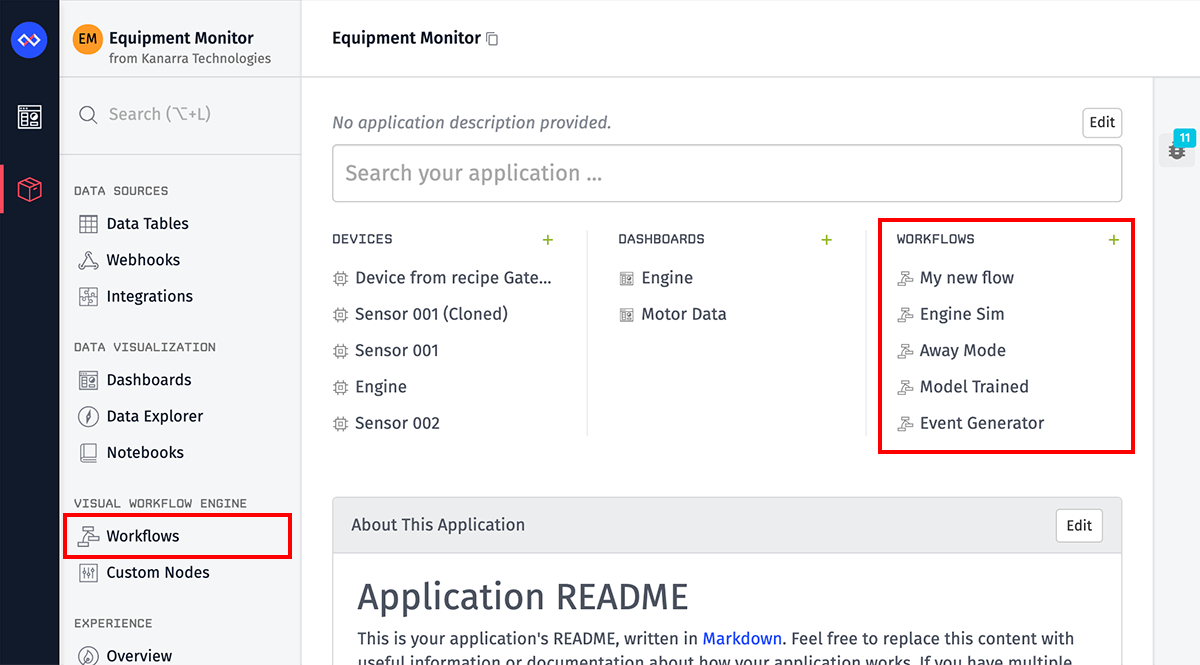
A list of your application’s workflows, broken down by type, can be accessed through your application’s subnavigation. They are also available on your application’s overview page.
Types of Workflows
There are four types of workflows, each of which features unique functionality and is best suited for specific use cases:
- Application Workflows run in Losant’s cloud and are for general purpose processing and data handling. They offer a wide variety of triggers to facilitate the ingestion and handling of data from multiple data sources or services. They are versioned independently.
- Experience Workflows run in Losant’s cloud and are designed for the data handling and custom back-end logic for Application Experiences. They can only be triggered by Experience Endpoints and they are versioned as part of an Experience Version.
- Edge Workflows run on your own gateway hardware and are executed by Losant’s Gateway Edge Agent. They provide additional nodes and triggers specifically designed to interface with local peripherals and data sources. They can run without an internet connection and will buffer any reported data while offline. They are versioned independently.
- Embedded Workflows are deployed to low-powered, embedded hardware and are executed by Losant’s Embedded Edge Agent. They bring the power of the drag-and-drop workflow engine, and its ability to make on-the-fly behavior changes, to hardware that is difficult to access or deploy new firmware to.
Creating a Workflow
Workflows can be created by clicking the “Add Workflow” button at the top of the Workflows page, or by clicking the “Add” link atop any of the lists of workflows broken down by type.

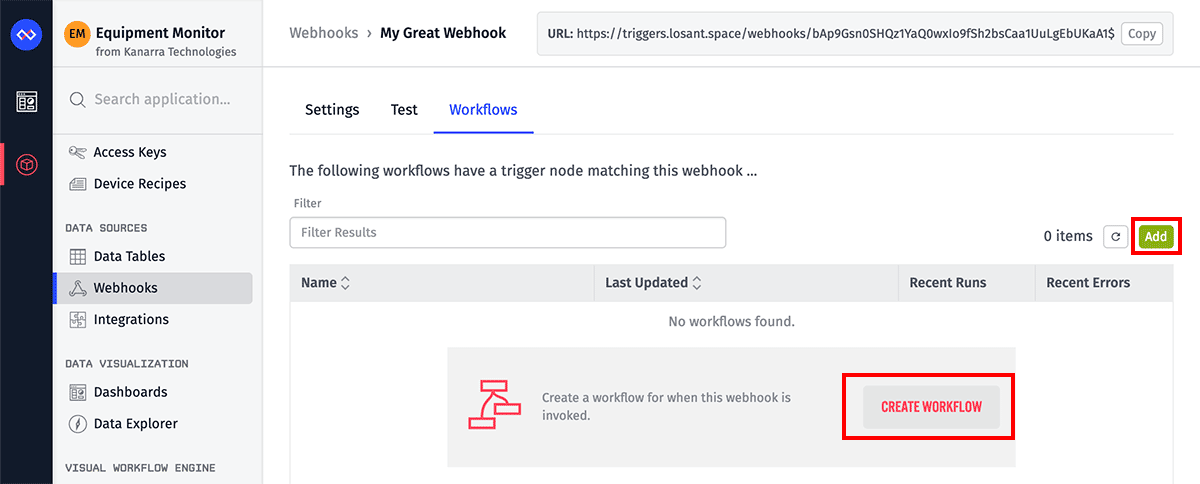
It is also possible to create workflows that are triggered by other Losant resources from the edit screens of those resources. For example, within the edit interface for a webhook is a list of application workflows that are triggered by requests to that webhook.
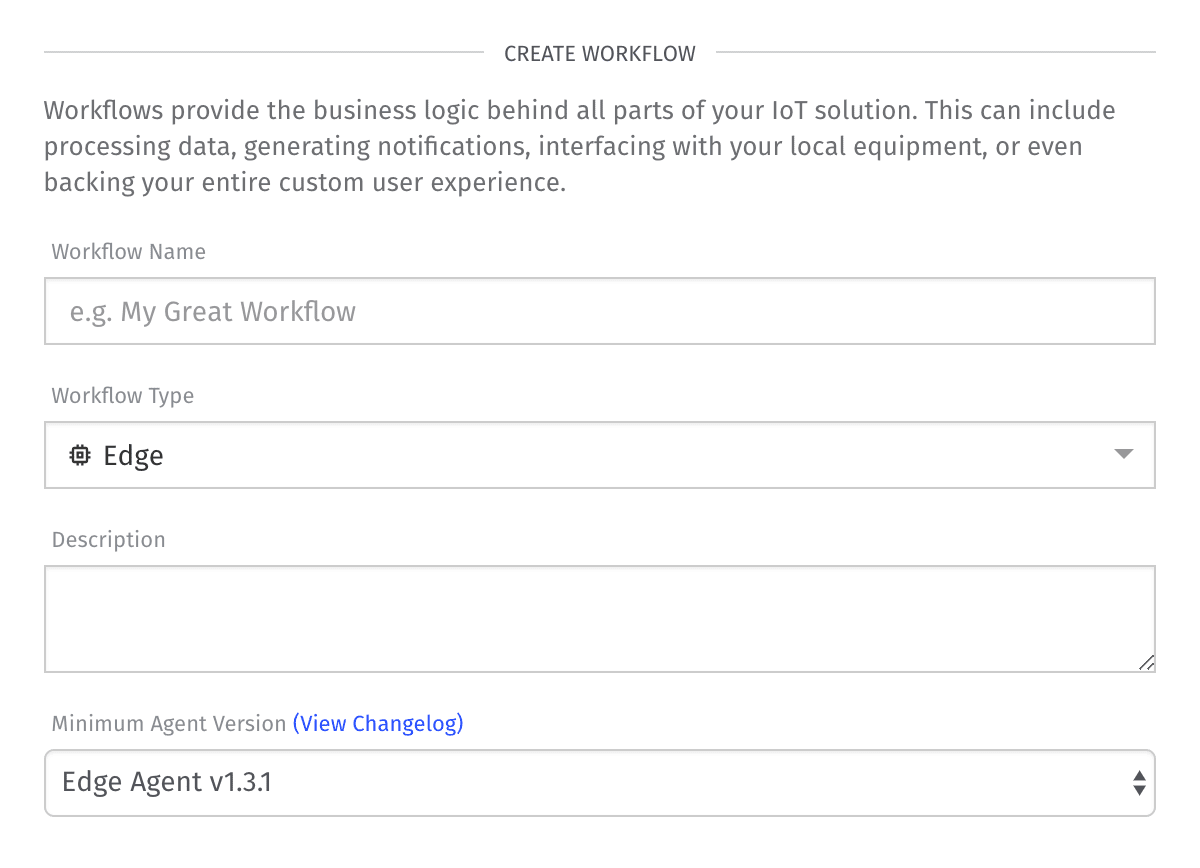
When creating a new workflow, you must choose one of the workflow types outlined above. The type cannot be changed after workflow creation. You must then give your workflow a name and optionally a description. If you are creating an edge workflow, you must also choose the minimum GEA version to target with your workflow. This can be upgraded (but not downgraded) at a later time.
Overview
All workflows start with a trigger, and that trigger includes a payload. The purpose of the workflow is to make decisions based on this payload, modify the data if needed, and eventually result in some kind of output.
As the payload flows through the workflow, fields can be added, removed or changed. Each node in a workflow accepts a payload as an input, optionally modifies it, and outputs the payload to be the input for the next node. Some nodes (e.g. the Conditional Node) don’t modify the payload at all and simply pass it through as-is, but they do provide a way to branch the workflow down multiple paths.
Example Workflow
Below is an example of how a payload flows through a workflow. This example uses an application workflow.

Let’s break down this workflow and explain the individual nodes and how they work with the payload. For this example, our use case is …
- A device is reporting temperature readings and we are using those state reports to kick off a workflow.
- The user would like to take an action if that temperature exceeds a certain threshold.
- This device reports temperature in degrees Fahrenheit; however, our user would prefer to receive reports in degrees Celsius.
- When the temperature does exceed the threshold, the user should receive an SMS alert.
Temp Sensor - Trigger Node
All workflows start with a trigger. There are many different triggers and each one starts the workflow with a different payload. All triggers, however, put their specific payload on the data field of the payload.
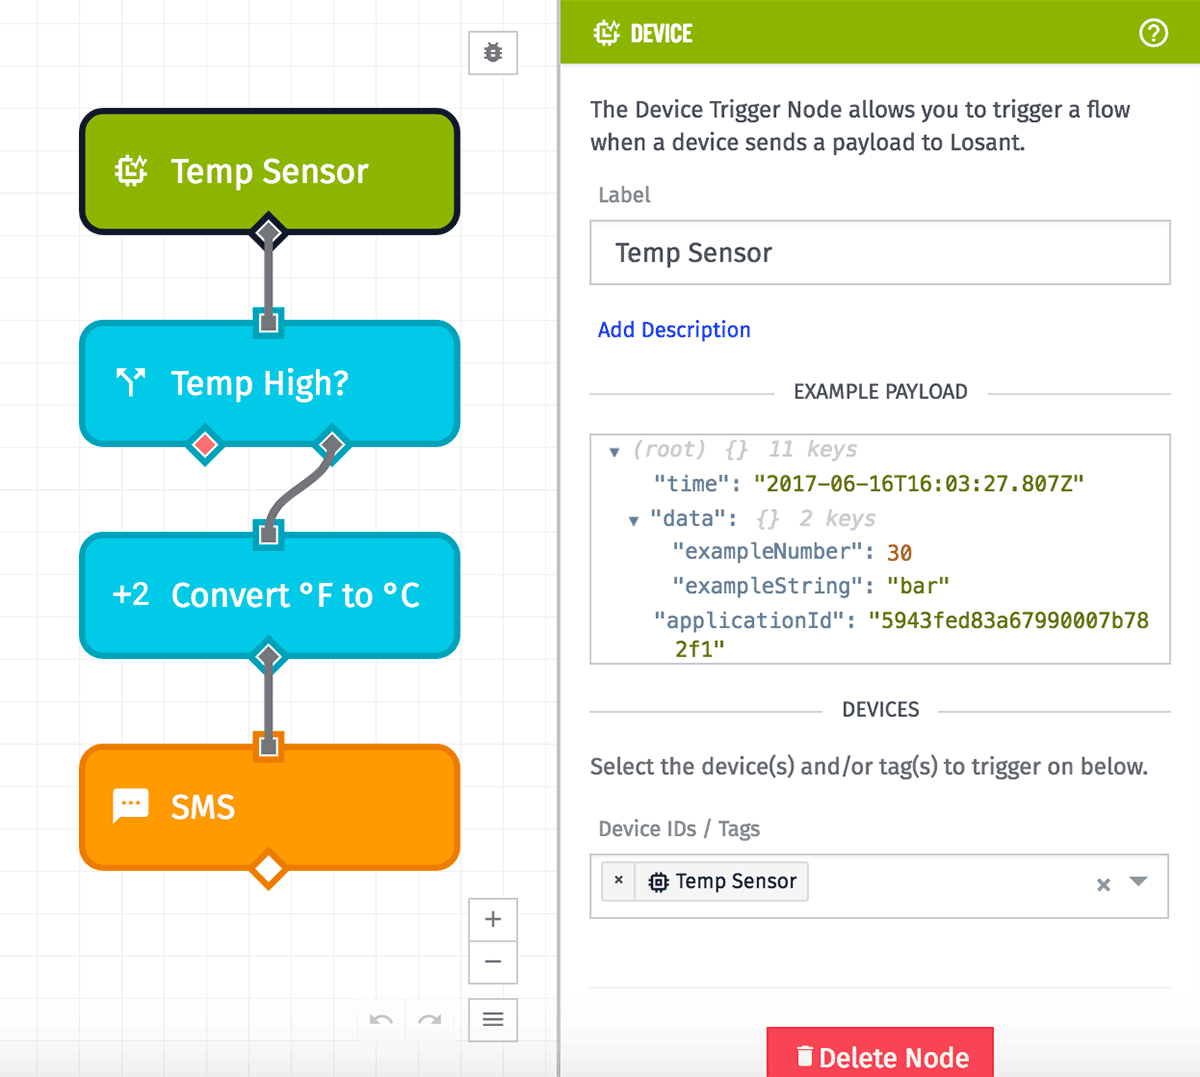
In this example we’re using a Device: State Trigger, which will run the payload whenever a device reports its state. The state that was reported is available on the payload’s data field. When the workflow starts, the payload will look like this:
{
  "data": { "tempF": 77 }
}
The workflow will then continue with this payload and pass it to the next node.
Temp High - Conditional Node
Conditional Nodes allow you to branch the workflow based on an expression that evaluates to true or false. If the expression is true, the workflow branches right. If the expression is false, the workflow branches left.
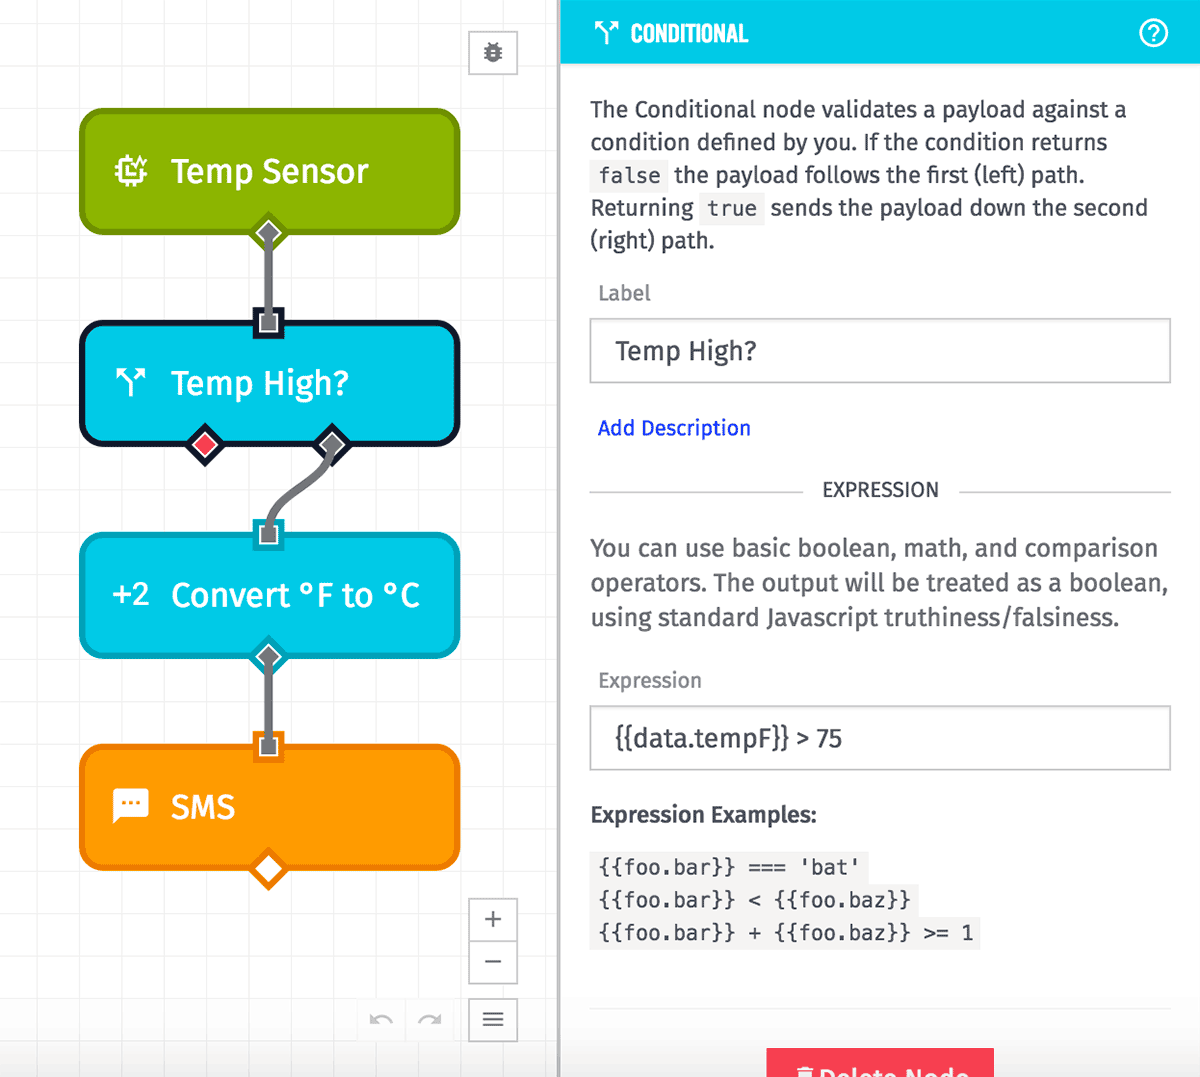
This node doesn’t modify the payload, but it is using a value in the payload to make a decision. In short, the expression in the Conditional Node allows for testing the truthiness of a condition against a payload property. In this example, the expression is:
> 75Whenever this node is executed it will grab the data.tempF value in the payload and check to see whether it’s greater than 75. Since we saw that the tempF value in our payload is currently 77, this workflow will branch to the right. The Conditional Node doesn’t modify the payload, so the same payload that was passed to it will flow as-is to the next node in the workflow.
Convert ˚F to ˚C - Math Node
A Math Node allows you to write mathematical expressions and store the result on the payload.
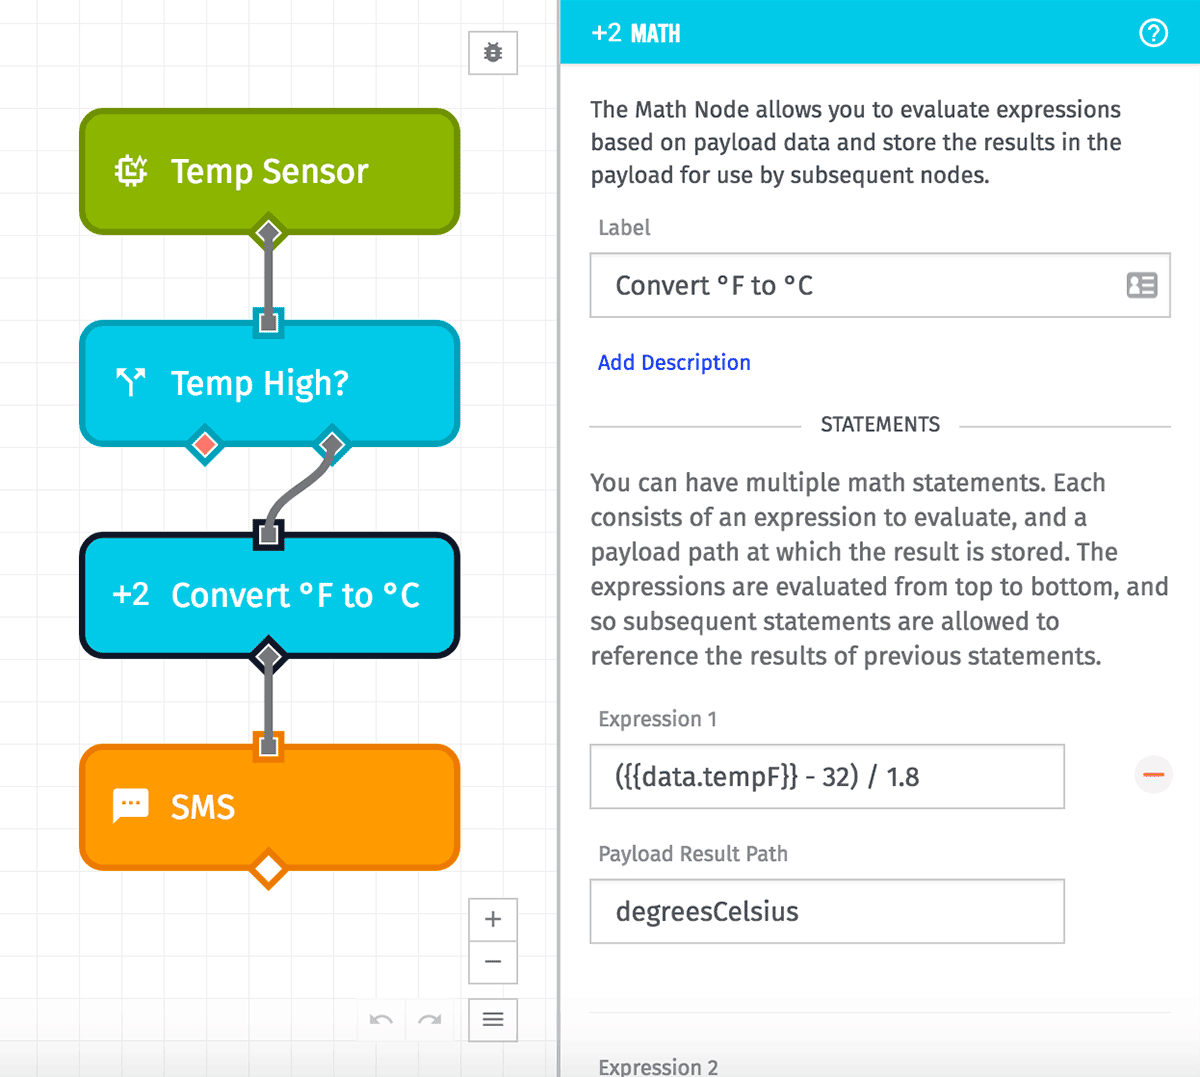
Each Math Node supports multiple statements, but this example is only using one. Each statement includes the actual expression and a payload path for where to store the result. For this example, the expression is:
( - 32 ) / 1.8Just like with the Conditional Node, you can reference values from the payload in these expressions. This is simply converting degrees Fahrenheit to degrees Celsius.
The second part of each math expression is a payload path for where to store the result. In this example the payload path is degreesCelsius; therefore, the result of the math expression will be placed on the root of the payload at the degreesCelsius property. The new payload now looks like:
{
  "data": { "tempF": 77 },
  "degreesCelsius": 25
}
SMS Node
The SMS Node allows you to send an SMS message to one or more phone numbers. This example demonstrates how to use the newly modified payload in a useful way.
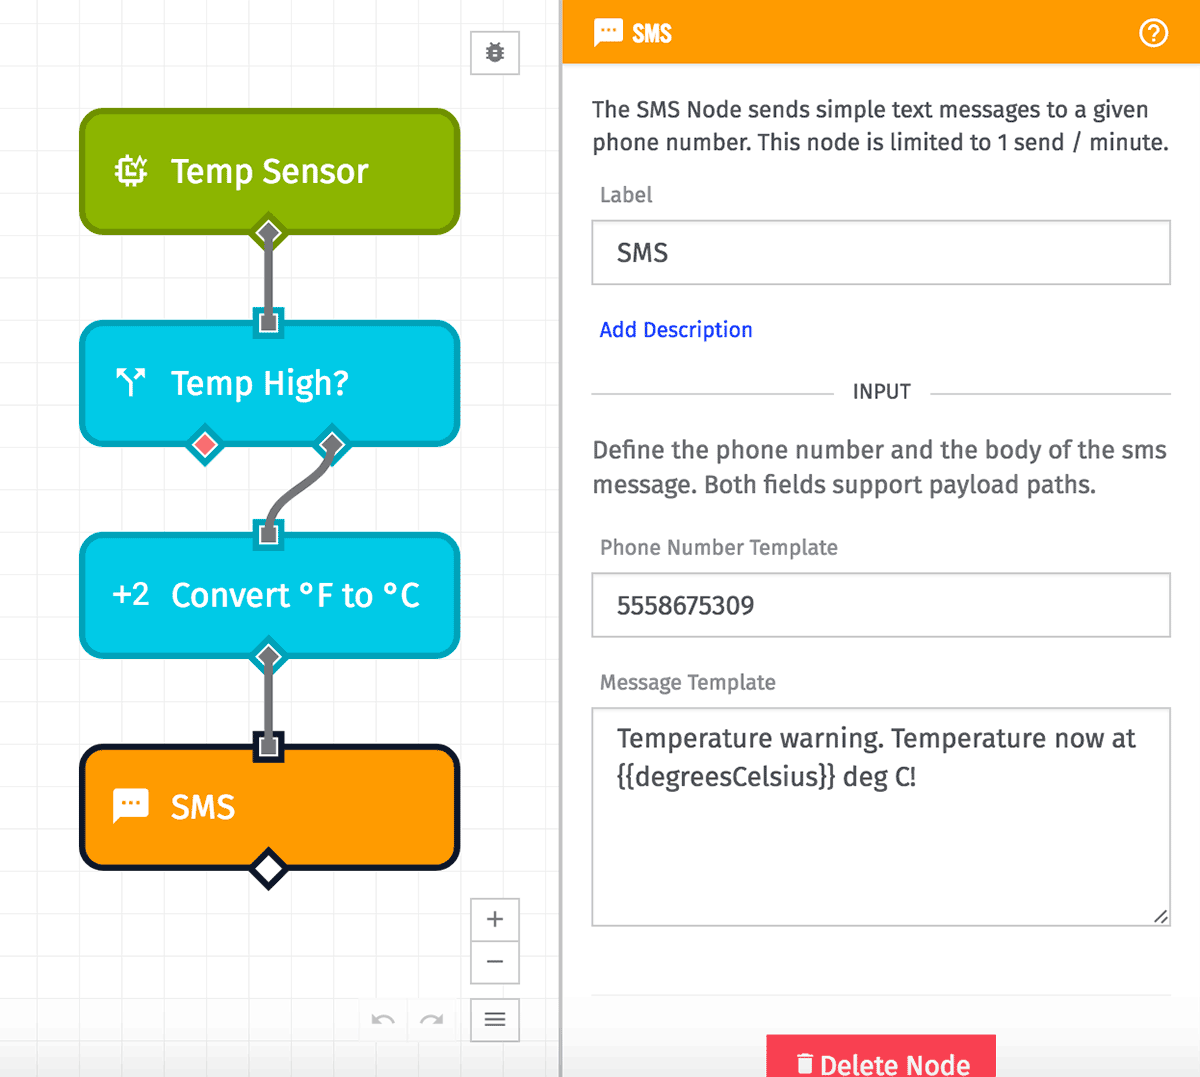
The SMS Node supports string templates for its configuration values – but unlike evaluating to a boolean as it does for the Conditional Node, or a number for the Math Node, the SMS Node uses that value to create a custom message containing a value from the payload.
Temperature warning. Temperature now at deg C!Next Steps
To improve this user’s experience, there are a number of additions and improvements we could make to this workflow. For example:
- The user’s phone number could be stored as a global variable so that the workflow could be exported without exposing the user’s number to others.
- To avoid repeat SMS messages when the temperature is above the threshold for a long time, we could insert a Latch Node to only send one alert each time the temperature crosses the threshold.
- We could move the conversion to Celsius above our Conditional Node and then use a Device State Node to set that converted value as a separate attribute on the device. This would allow us to also visualize the Celsius values in a dashboard, such as in a Time Series Block or a Gauge Block.
Common Payload Fields
The payloads described above only include what was added by the trigger. All payloads include a common set of other, potentially useful fields:
{
  "time": <time of the event>,
  "data": { ... },
  "applicationId": <id of the current application>,
  "applicationName": <name of the current application>,
  "triggerId": <id of the workflow trigger>,
  "triggerType": <name of the trigger>,
  "flowId": <id of the current workflow>,
  "flowName": <name of the current workflow>,
  "globals": <object of workflow globals>
}
For example, a timer trigger will start a workflow with the following payload:
{
  "time": Fri Feb 19 2016 17:26:00 GMT-0500 (EST),
  "data": {},
  "applicationId": "56311a8e51645b2054eb258b",
  "applicationName": "My Timer App",
  "triggerId": "78fbb050d7f811e5b995b3a5b31df7d8",
  "triggerType": "timer",
  "flowId": "56c8967bb8df0f0100d62912",
  "flowName": "My Timer Flow",
  "globals": {}
}
Import / Export
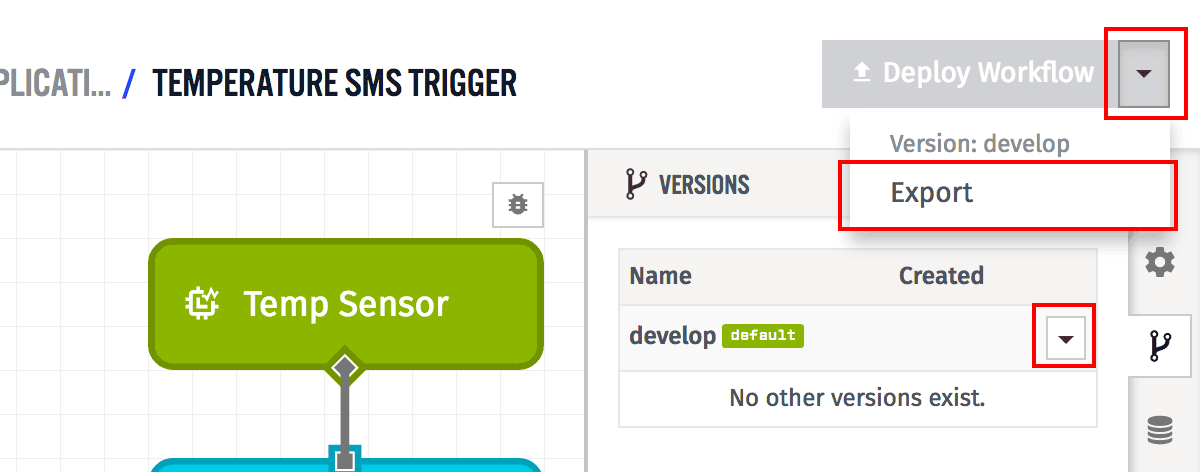
Workflows and their versions can be exported by clicking the dropdown alongside the Deploy Workflow button, or by clicking the dropdown in the version row. Clicking the Export option opens a modal that exposes some options for the export.
Exporting as a File
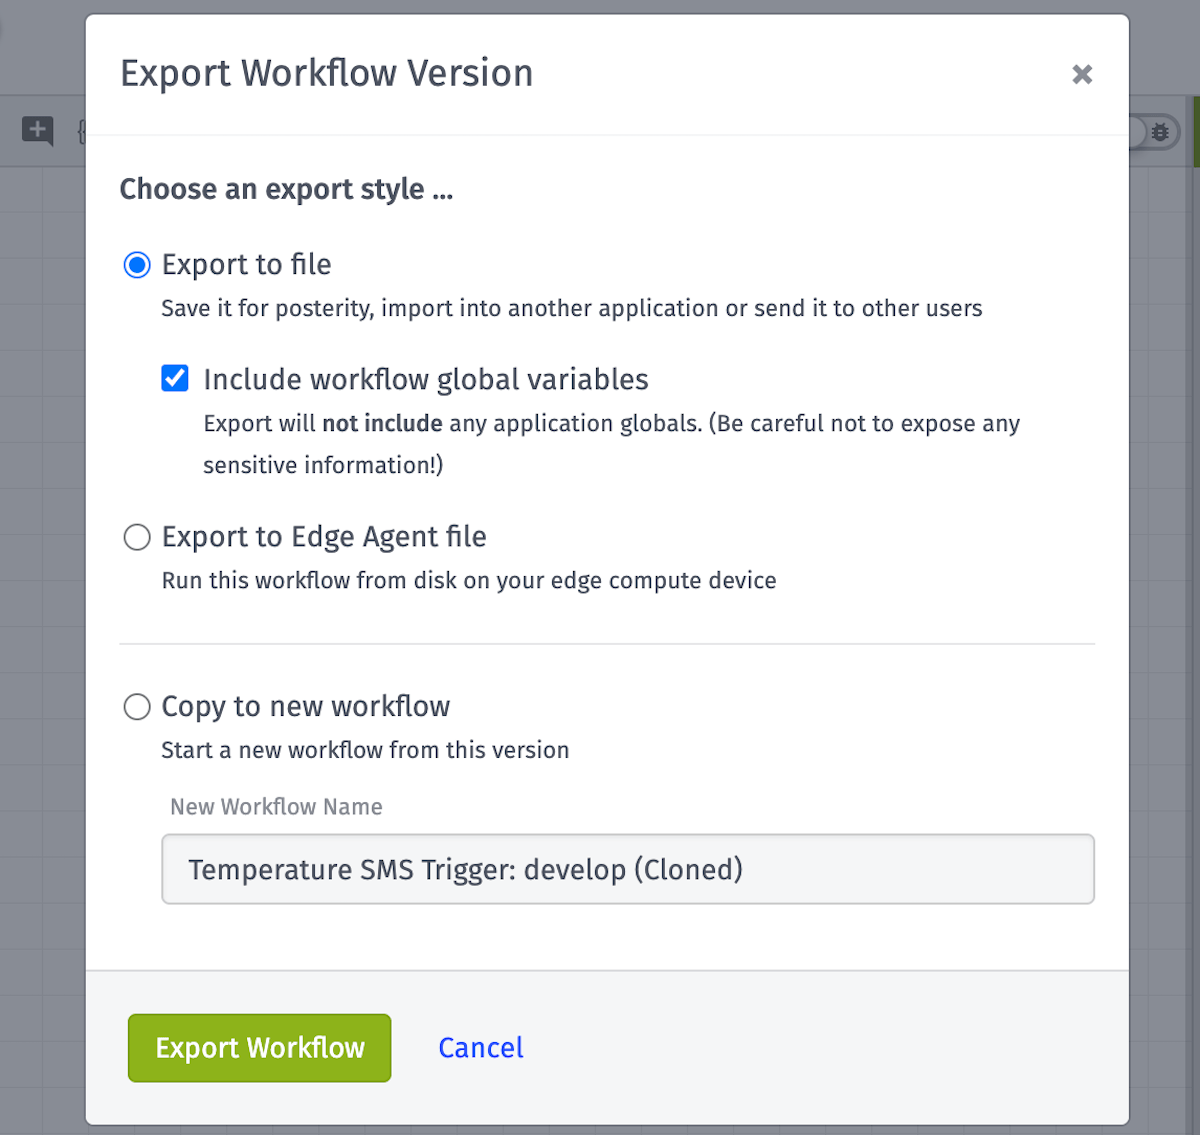
When exporting the workflow as a file, you must also choose whether to include the values of your workflow globals in the export bundle. (Application globals are never included.) If you intend to share this workflow with other users outside your organization, and the workflow utilizes globals to store sensitive information, then the file should be exported without global values included.
Note: When excluding workflow global values, the export file will still include the workflow global keys, so that the user importing the workflow file knows which values are required to successfully execute the workflow.

Given an export file, you can import a workflow from your application’s workflows list, by either dragging the exported file onto the appropriate list, or clicking the Import button (which will allow you to browse for an exported workflow file).
Note: Imported application workflows are disabled by default to give you the chance to make any needed modifications before the workflow starts running.
Exporting for On-Disk Use
This option is only available for edge workflows, and it allows your workflow version to be exported in a format that can then be loaded directly onto your hardware and run from disk.
There are a few considerations when exporting an edge workflow in this format:
- Global values are always included in the export file. Therefore, if your workflow utilizes globals to store sensitive information (such as third-party API credentials), this file should never be shared with users outside of your organization.
- On-disk exports cannot be imported into Losant as new workflows due to formatting changes in the export file that allow it to be run from disk.
Cloning Workflows
Selecting this option creates a copy of the workflow version as a new workflow in your application. The clone applies only to the selected version and adds it as the “develop” version in a new workflow; in other words, workflow versions associated with the cloned workflow are not ported to the new workflow.
Workflow Globals
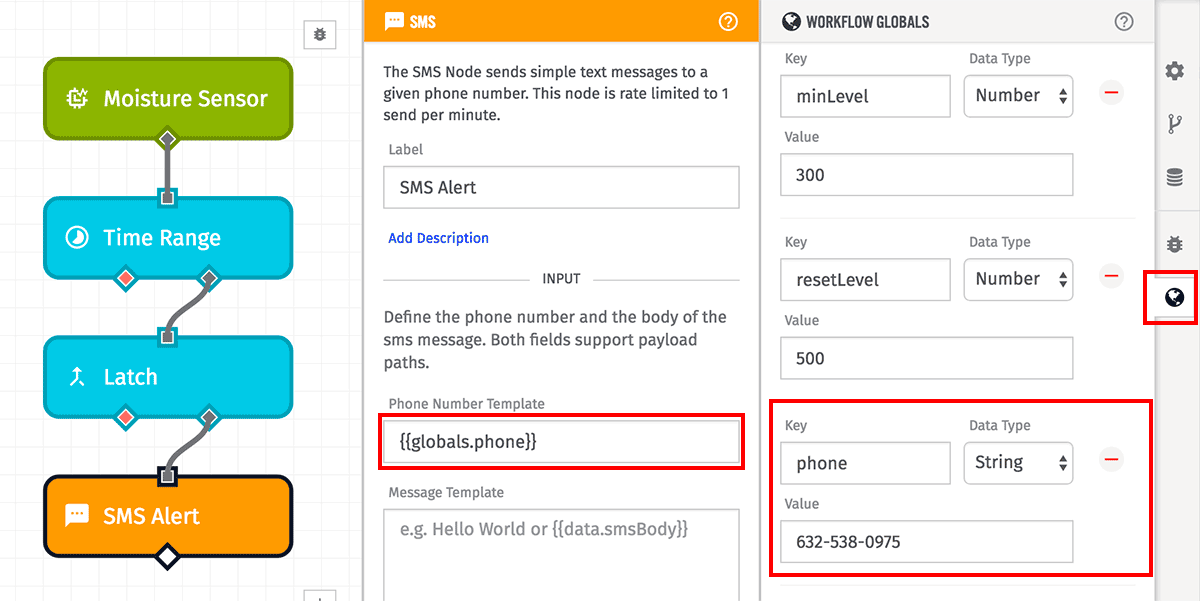
Workflows can have a set of global config keys, which are essentially keys/value pairs added to the payload under the globals key whenever the workflow runs. This is a great place to store configuration values or API keys, especially if they are needed for use in multiple different nodes. Globals can be accessed through the “Globals” tab in the right dock.
Application Globals configured in the application will also be accessible here. Application globals can be overridden at the workflow version level by creating a workflow global with the same key name.
Experience Globals configured in an Experience Version will also be accessible only in Experience Workflows. Application globals with the same key as an Experience Version Global key will be overridden, while any Workflow Global with the same key will override an Experience Global.
In the above example, there are three global keys set — minLevel (with a numeric value of 300), resetLevel (with a numeric value of 500), and phone (with a string value of 513-555-1212). Complex objects can be configured by choosing JSON as the data type of the value and adding JSON-formatted data as the value. Whenever the workflow runs, the payload will always include these global values. For the above example, a payload might end up looking like the following:
{
  "time": Fri Feb 19 2016 17:26:00 GMT-0500 (EST),
  "data": {
    "moisture": 576
  },
  "globals":{
    "minLevel": 300,
    "resetLevel": 500,
    "phone": "513-555-1212"
  },
  "applicationId": "56919b1a9d206d0100c54152",
  "applicationName": "Light Wall",
  "triggerId": "56c794a06895b00100cbe84c",
  "triggerType": "deviceId",
  "deviceTags": {},
  "deviceName": "Moisture Sensor",
  "flowId": "56956cd25a6f2f0100dc70d4",
  "flowName": "Moisture Alert",
  "globals": {}
}
These values will be accessible in any node configuration that expects payload paths (such as globals.minLevel) or templates (such as {{globals.phone}}).
Workflow globals are version-specific. Changing global values in one version (including your develop version) will not affect globals in your other versions. However, changing an application global’s value will affect any versions referencing that global, provided the value was not overridden for that version.
Workflow Storage
The workflow storage interface lets you view and manipulate the persistent workflow storage. This is the storage space used by the Get Value and Store Value nodes. The storage interface is located under the “Storage” tab in the right dock.
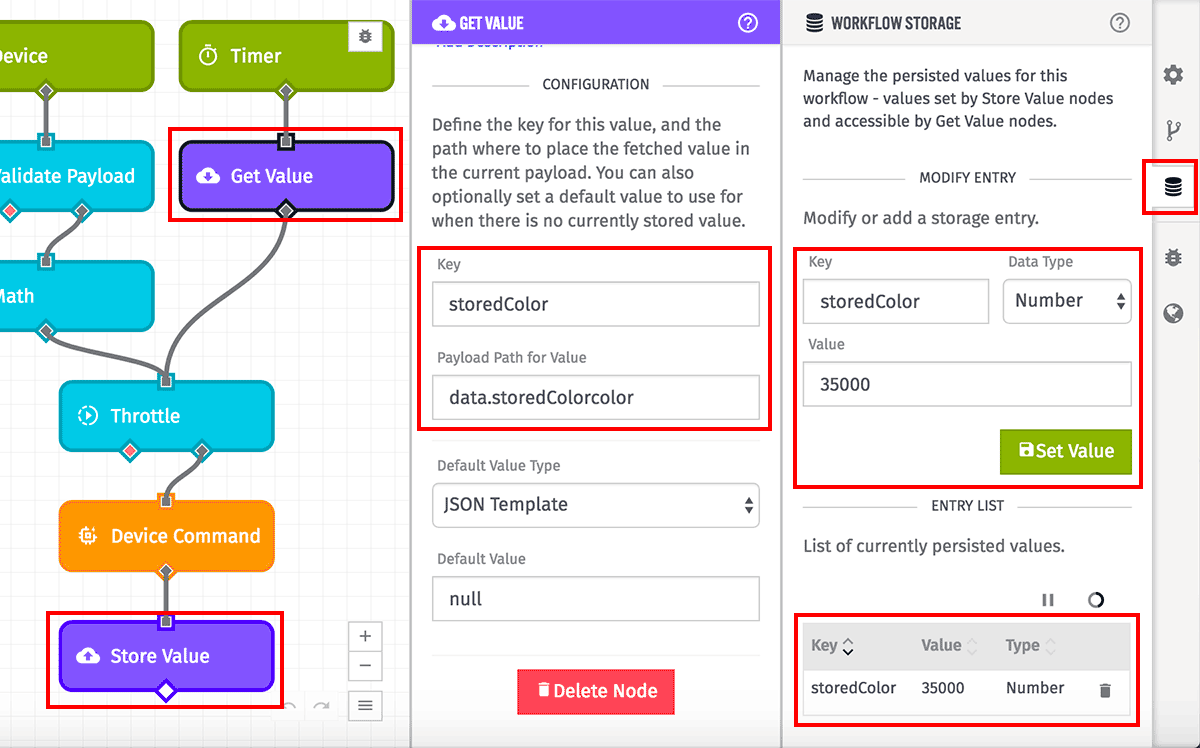
In the top half of the interface, you can add new storage entries or modify existing ones. Specify the identifier to add (or change), specify the value and the Data Type, and click Set Value. The data type can be String (the value is treated as a string), Number (the value is treated as a number), or JSON (the value is parsed as JSON). The JSON data type can be used to set complex objects or arrays, or even just true/false/null.
NOTE: The act of clicking Set Value has an immediate effect across all workflow versions. This will change or add the value immediately; this is separate from saving/deploying the workflow.
In the bottom half of the interface, you can view the values of existing storage identifiers. In this case, there is one identifier, storedColor, and its value is the number 35000. This identifier was previous set by the Store Value node in a previous run of the above workflow. This table of values will automatically refresh every 60 seconds, but you can always click the refresh link on the upper right if you want to see the latest values now.
Workflow Storage Limits
A workflow can have a maximum of 16MB total in storage at one time. A workflow can have a maximum of 16,384 storage keys at one time. Each value is limited to 16,384 KB. If a workflow exceeds any of these limits, adding new a storage key will error.
Storage keys do expire. If a key has not been changed or accessed within the data retention limit of the owning Organization or Sandbox, the storage key will be deleted.
Deleting Storage Values
You can also delete values individually by using the delete button on the right of each row, or wholesale by clicking the “Clear All Entries” button at the bottom of the table.
NOTE: Deleting, just like setting or modifying a value, takes effect immediately and is not tied to saving/deploying the workflow.
Was this page helpful?
Still looking for help? You can also search the Losant Forums or submit your question there.
