Devices
A device can be a physical sensor or a virtual resource, such as the data generated by a third-party API. Data against a device is stored as Device Attributes in a time series database, and from there the data can be acted on, analyzed, and visualized using other components of Losant.
A list of your application’s devices can be found under the “Devices” tab in the application menu.
Adding a Device
To add a new device, click the “Add Device” button at the top of your devices list.

Choosing a Device Type
Clicking “Add Device” will take you to a screen where you will choose which type of device to create. While you may change this type after creation (except when creating a system or trying to change a device’s type to a system), doing so can be disruptive to your application; therefore, you should know which type of device you’d like to create before proceeding.
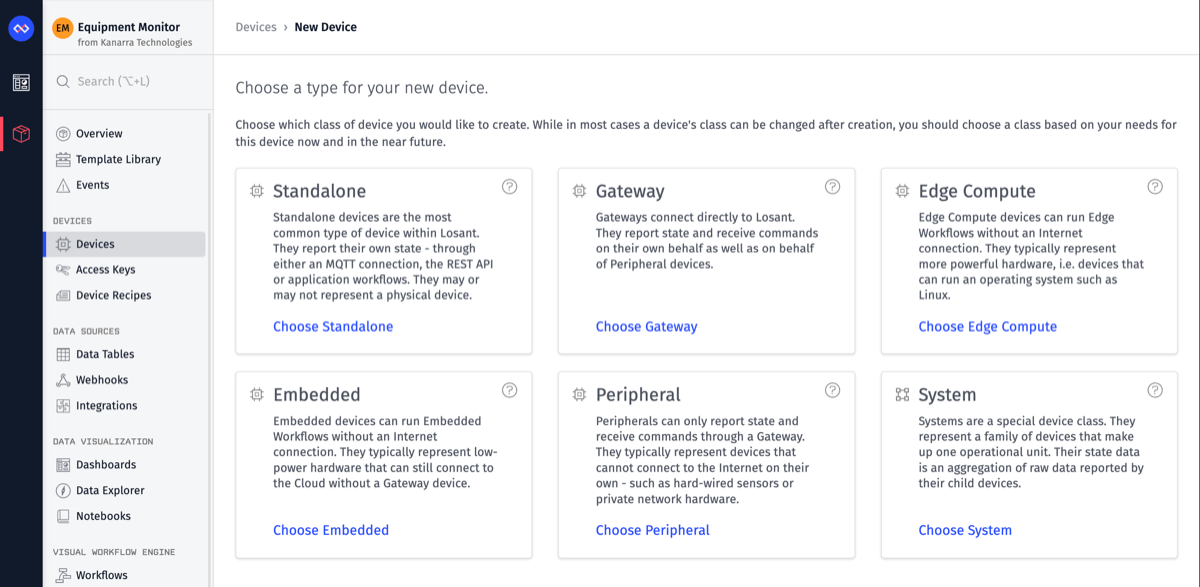
Standalone
A standalone device is the most common type of device in Losant. Standalone devices connect directly to Losant and report their own states. If your device data is generated by a third-party API, you can represent it as a standalone device in Losant.
Gateway
A Gateway device connects to Losant and reports both its own state and the state of other devices, for example, other devices that use this device as a “gateway.” Gateway devices can report the state of non-internet connected devices to Losant, such as Bluetooth sensors.
Edge Compute
An Edge Compute device runs the Losant Gateway Edge Agent and can run Edge workflows directly on the device itself. They also can behave as Gateway devices in that they may report state on behalf of a Peripheral device.
Embedded
An Embedded device runs the Embedded Edge Agent and can run Embedded workflows directly on the device itself. Embedded devices typically represent physical hardware that, while low-powered and memory-constrained, is still capable of connecting directly to Losant’s MQTT broker.
Peripheral
A Peripheral device device does not connect directly to Losant; instead, it reports its state either to a gateway or Edge Compute device (which is connected to the internet), and that gateway pushes the peripheral’s state to Losant. When choosing peripheral as the device type, there are two options:
- You can either choose to let the device report state through any gateway in the application (which is useful for devices that move through the range of multiple gateways).
- You can choose to only allow reporting through a specific gateway (useful for static or directly connected devices).
System
A System device behaves more as a grouping mechanism and a model of a larger physical environment than a typical device. Systems cannot connect to the platform, report their own state, nor receive commands. Instead, their state attributes are an aggregation of the raw data reported by their child devices. As noted above, unlike the other types, a device’s type cannot be changed to or from a system after creation.
Choosing From a Device Recipe
On the same screen you have the options to create a device from an existing device recipe or to import a device recipe from the Template Library and create a device from that recipe.
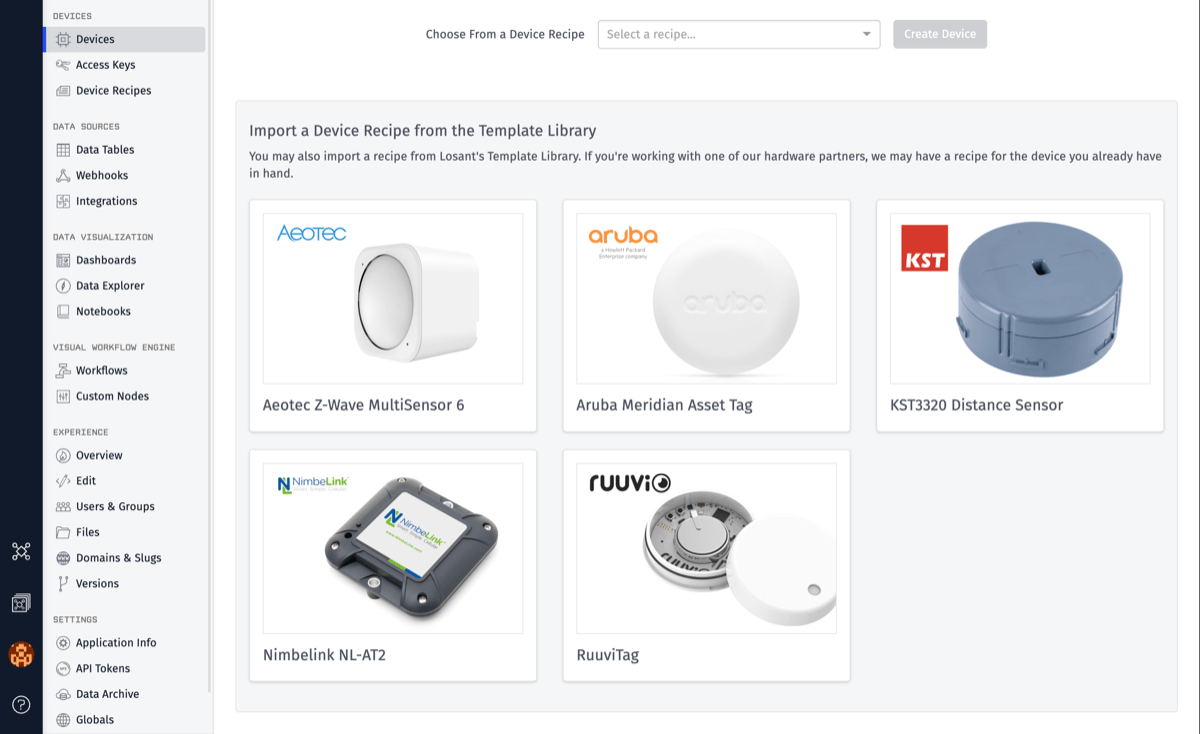
Create A Device From an Existing Recipe
Choose from the dropdown menu of available recipes and click “Create Device”. Please note that device recipes must exist in your application in order for them to appear in the dropdown menu.
Import and Create a Device From the Template Library
Click on one of the available device recipe templates. More information about the device recipe is displayed to help you decide if the device is right for your application. Clicking on “Import & Create Device” will import the device recipe into your application and create a device from it.
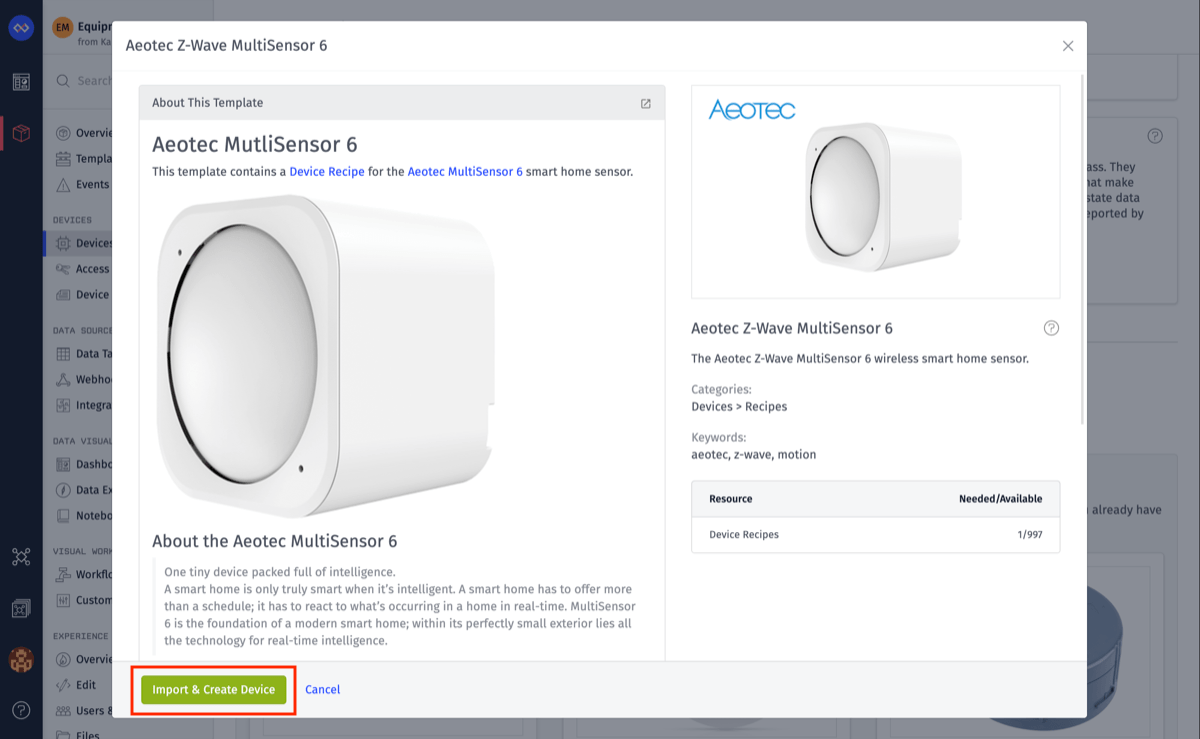
Templates can be re-imported, which may lead to duplicate recipes in your application. Recipes that have been imported in the past will be available in the device recipe dropdown menu. We recommend choosing a device recipe from that menu instead of re-importing a template.
Device Configuration
After choosing a device type, you will then be asked to fill in the following information:
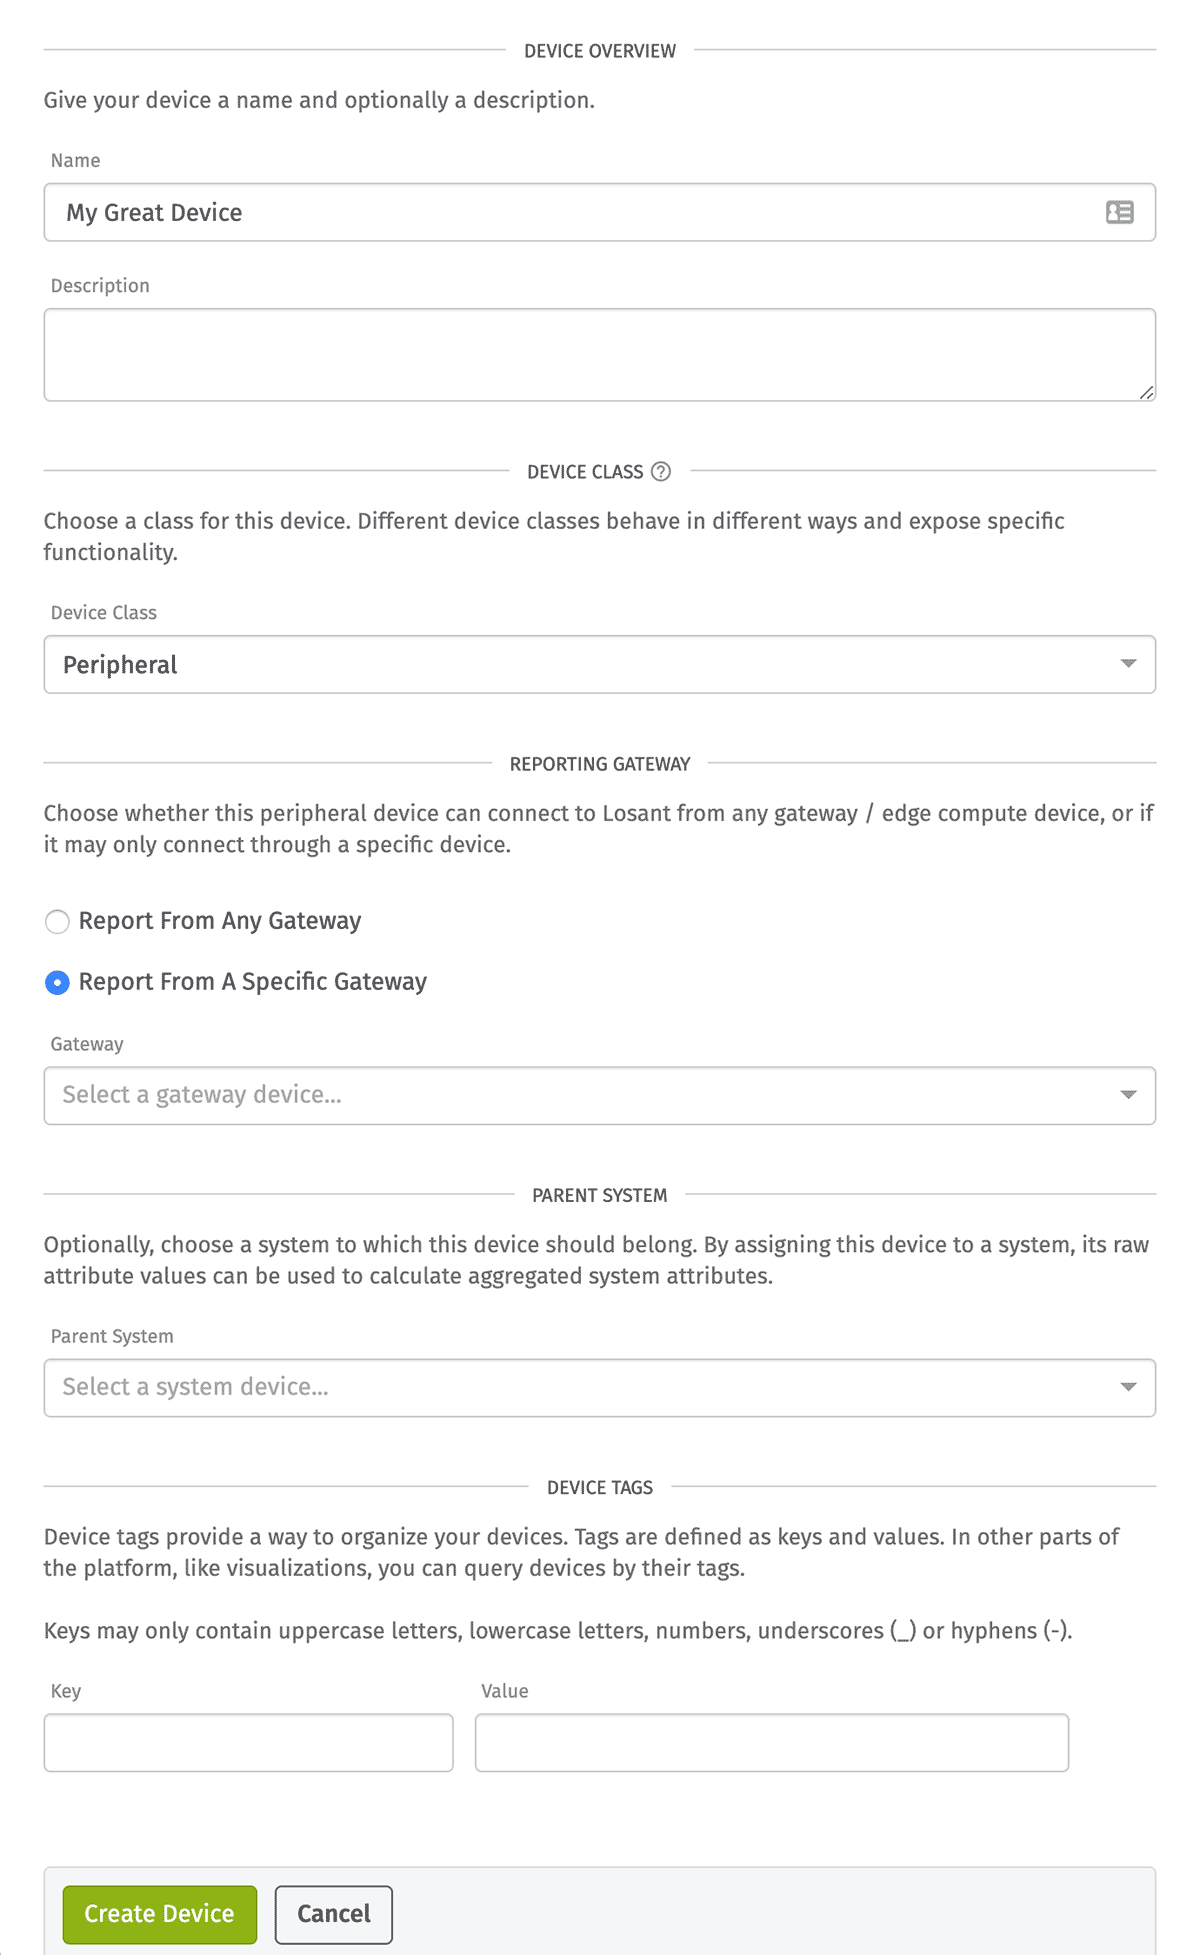
- Name: Enter a human-readable name for the device. This field is required, and we highly recommend (but do not require) it be unique across the application.
- Description: Optionally, you may also include a longer explanation of the device.
- Device Class: Though this was chosen on the previous page, you have the option of modifying the device class before creation here.
- Reporting Gateway: This section is only present if “Peripheral” is chosen for the device class. You must choose if this device’s state can be reported by any gateway device or only by a specific gateway.
- Parent System: Optionally, you may assign this device as a child of any existing system.
- Device Tags: You may enter a set of key/value pairs as tags on the device. More info on how to use device tags can be found below.
If you have created a device from a recipe, the same configuration options will be displayed, except that it will be pre-populated with the recipe’s values. You may update these values as you see fit.
After you have configured your device, click “Create Device” or “Save Device” depending on if you have created a device from a recipe at the bottom of the form. This will add the device to your application or update it if the device was created from a recipe. After a successful creation, you will be redirected to an interface where you can define the new device’s state attributes.
Other Ways to Add Devices
In addition to adding a new device from your device list, there are a couple of other methods by which a device can be created:
- From the dropdown atop the devices list, you may use a device recipe either to create a single device or to create devices in bulk. Choosing one of these options will take you to a screen where you must choose a recipe before proceeding.
- In a workflow, the Device: Create Node can be used to add new devices. (You can also fetch, modify, and delete devices using the Device: Get, Device: Update and Device: Delete Nodes, respectively.)
Device Tags
Device tags allow you to group and organize your devices. Tags are defined as keys and values and they can be set to anything you’d like. Tags can be used in many other areas of the Losant Platform including choosing devices for visualizations, access keys, and workflow triggers. See the section on device queries for targeting devices by tag within the platform.
Tags are also a great place to store things like device configuration or threshold values, as the tag keys and values for a device are available to use within workflows (both in the cloud and on the edge) as well as in a number of the dashboard blocks.
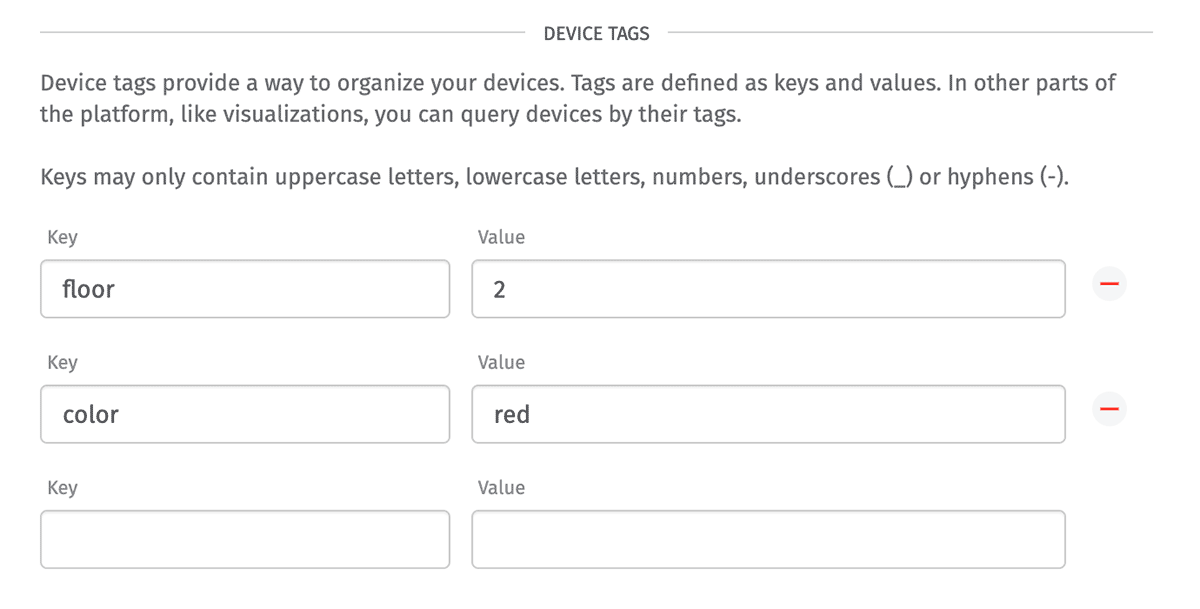
In the above example, the floor tag is set to the value of 2 and the color tag is set to red. If you had many devices on different floors and of different colors, you could easily query all devices where floor=2 or color=red to find the specific devices.
Device Debugging
Once the device is added, there are several useful pieces of information available in the right column on the device page.
Device Communication Log
The device communication log is similar to the application log in that it displays a real-time stream of events; it differs from the application log in that these events are specific to the device currently being viewed, instead of across the application as a whole. A number of different events will display within the log, such as:
- State reports for the device, whether they come via the device itself through the Losant broker, via a workflow, or through the Losant REST API.
- Commands sent to the device, delivered via any of the channels mentioned above.
- Device connection, disconnection, and authentication events with info such as connection IP and method. For peripheral devices, the log will display these events for the peripheral’s gateway.
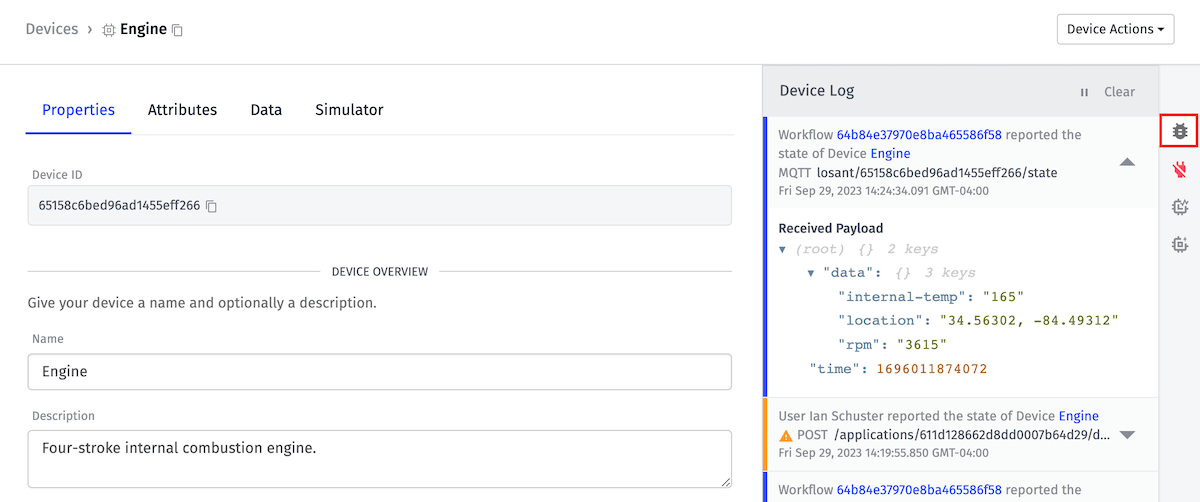
Arbitrary topics the device publishes to or is subscribed to will not display within the device communication log.
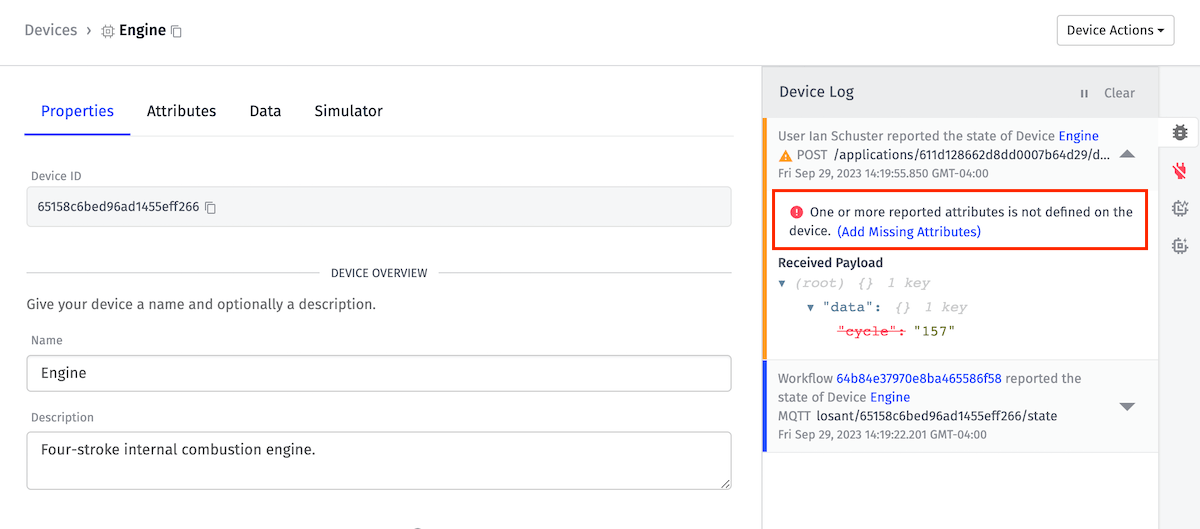
State reports containing missing attributes for the device are indicated in the Device Log. They can be added by clicking on the “Add Missing Attributes” link.
Connection Log
The current connection status of your device is available in the Connection Log panel. For peripheral-type devices, the connection status of the gateway device that it is configured to use is displayed.
For Standalone and Gateway type devices, you can also view a log of recent device connection events in the Device Connection Log of the Connection Log panel. This panel has a customizable time range selector where you can change the time range, or apply a specific date range for which you wish to see connection logs.
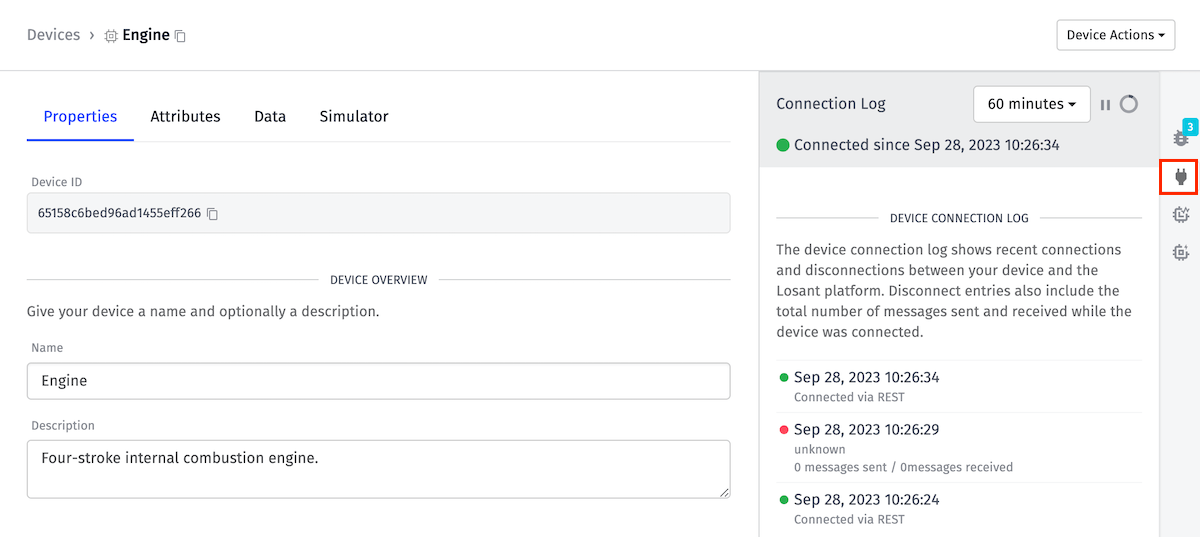
Whenever a device is disconnected, the log will contain the reason and - if the connection events happened over the MQTT broker - the number of messages sent and received during the connected period. Typically messages sent correspond to state updates and messages received correspond to commands. If applicable, the IP address of the connection will also be displayed in the connect/disconnect entries. A device can disconnect (or be disconnected) for a number of different reasons:
Connection <outbound|inbound> throughput limit exceeded: The connection was terminated due to the client exceeding message rate limits on the connection as a whole. See MQTT rate limits for more information.Connection Lost/Connection Closed/ECONNRESET/EPIPE: The connection to the device was terminated uncleanly. This could mean the device lost internet access, or was hard power cycled, or was terminated by something between the device and the broker.Device establishing new connection, closing previous connection: This means that a new connection for the device was established to the MQTT broker while a previous connection existed. The two common reasons for this are that either there are two clients attempting to connect with the same device ID, or the client thought the previous connection was no longer alive (and so established a new one), but the broker had not yet realized yet the previous connection was no longer alive.Device no longer allowed: The device is no longer allowed to connect to the broker with its current configuration, and so the connection was terminated. Common reasons for this are a change to the device type, or the Access Key being revoked.Device throttled: The device is currently banned due to exceeding message rate limits.Disconnect Requested: The device requested a disconnect from the MQTT broker.Keepalive Timeout: The device was disconnected because it did not satisfy the keepalive requirements of the connection - there was no traffic over the connection for 1.5 times the keepalive value requested by the client. This is often by default 90 seconds.Payload exceeds maximum allowed size: The device was disconnected because it attempted to publish a message larger than the maximum allowed payload size.Publish Error - Not allowed to publish on <topic>: The device was disconnected because it attempted to publish to an invalid or disallowed topic.Retain Not Allowed: The device was disconnected because it attempted to publish a message with theRetainflag set.Subscription Error: The device was disconnected because it attempted to subscribe to an invalid or disallowed topic.The server-side MQTT broker has been restarted for maintenance or upgrades: The connection was terminated due to the Losant MQTT broker cycling connections.Too many inflight packets: The device was disconnected because it sent too many QoS 1 to the broker without waiting for acknowledgment of prior publishes.Topic <outbound|inbound> throughput limit exceeded on <topic>: The connection was terminated due to the client exceeding message rate limits on the given topic. See MQTT rate limits for more information.
State Report History
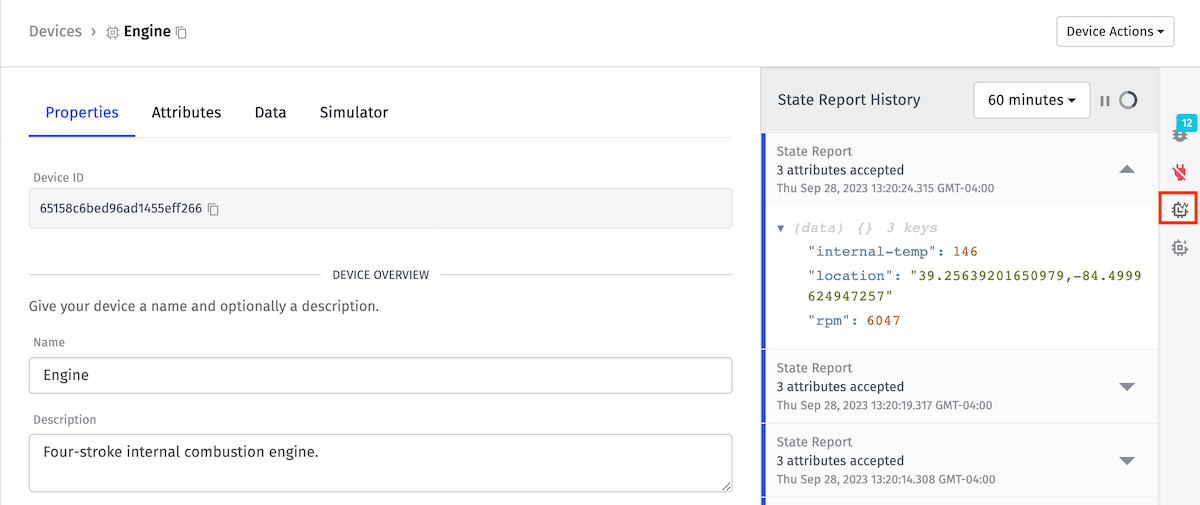
By default, this list will display up to 1000 states reported within the past 60 minutes. You may click on the time range selector to alter the time range, or set a custom date range to view. Each entry displays the raw JSON data that represents a state request.
Command History
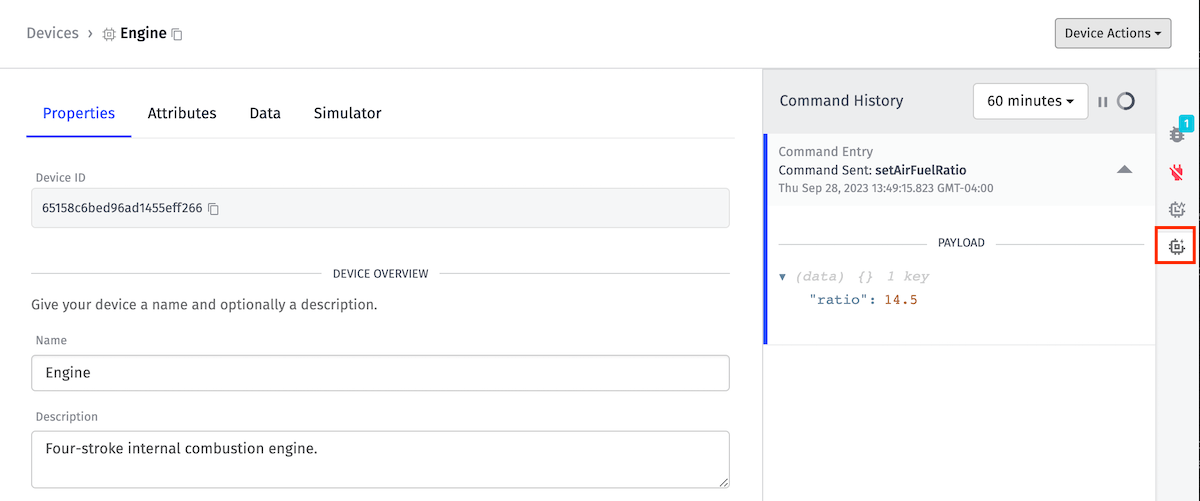
By default, this list will display up to 1000 commands sent to the device within the past 60 minutes. You may click on the time range selector to alter the time range, or set a custom date range to view. Each entry displays the command name, as well as any data sent with the command. It is important to note that this list only shows that the commands were sent, not that they were necessarily received by the device.
Other Device Actions
From the device’s detail page, there are a number of additional actions you can take against the device. These can be reached from the dropdown menu in the top right corner of the page.
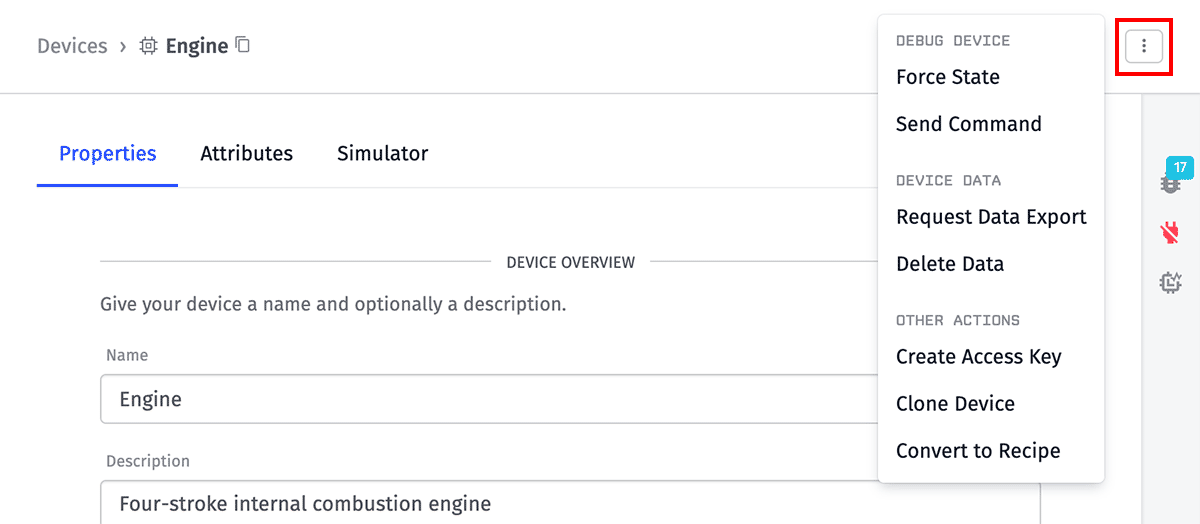
Note: If you have any unsaved changes on the device (i.e. you’ve updated its name or added an attribute but not yet clicked the “Save” button), these other actions are unavailable.
Depending on the type of device and your permissions within the application, some of these actions may not be available.
Force State
Forcing device state is an excellent way to debug workflows, dashboard blocks, or other actions that are triggered by a device state report.
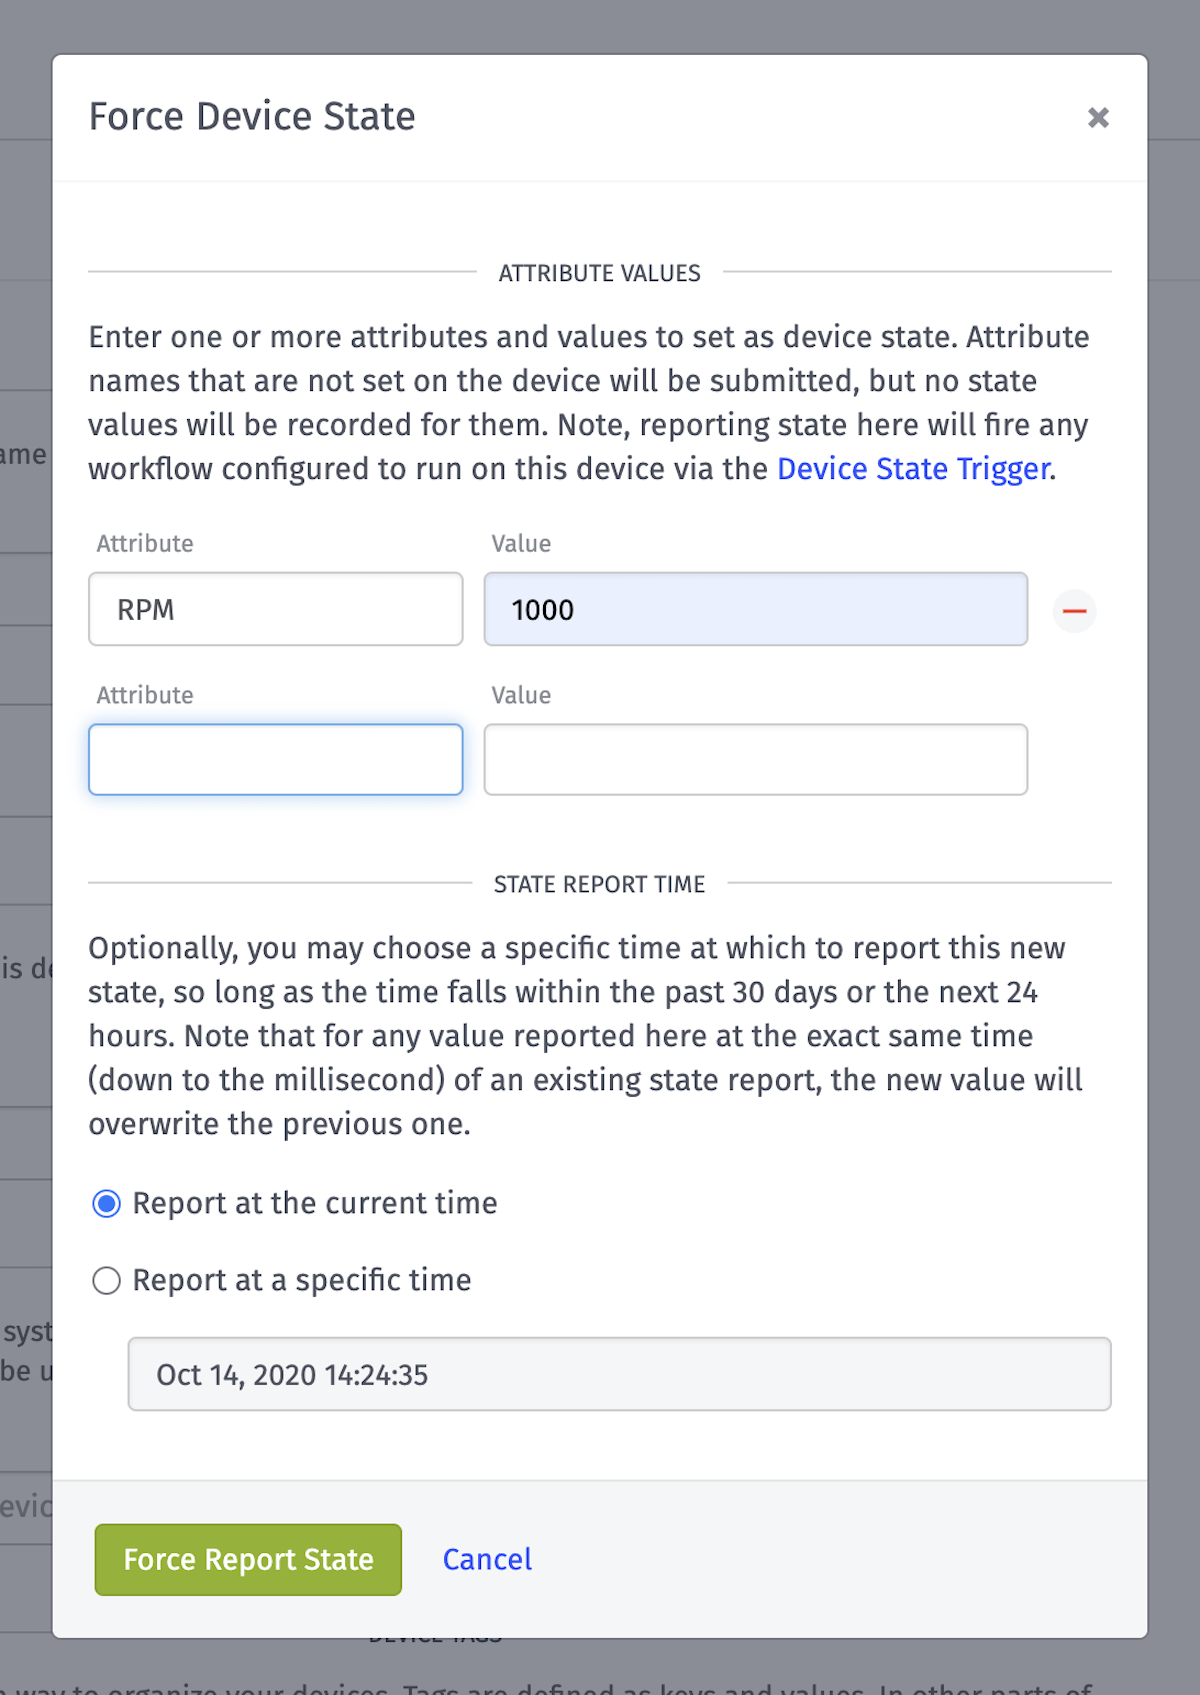
Enter values for each of the device state attributes you’d like to report. Note that we do not validate that the value entered for a state attribute is valid for its data type - nor do we ensure that an attribute actually exists on the device - so that you may also debug invalid state reports through the modal.
Note: This option is not available for System devices.
Send Command
If you have code on your device that is listening for commands sent from the platform - or, in the case of edge compute devices, if you have workflows with Device: Command Triggers deployed to the device - you can debug that functionality by sending a command here. Enter a command name and optionally a payload to send to the device.
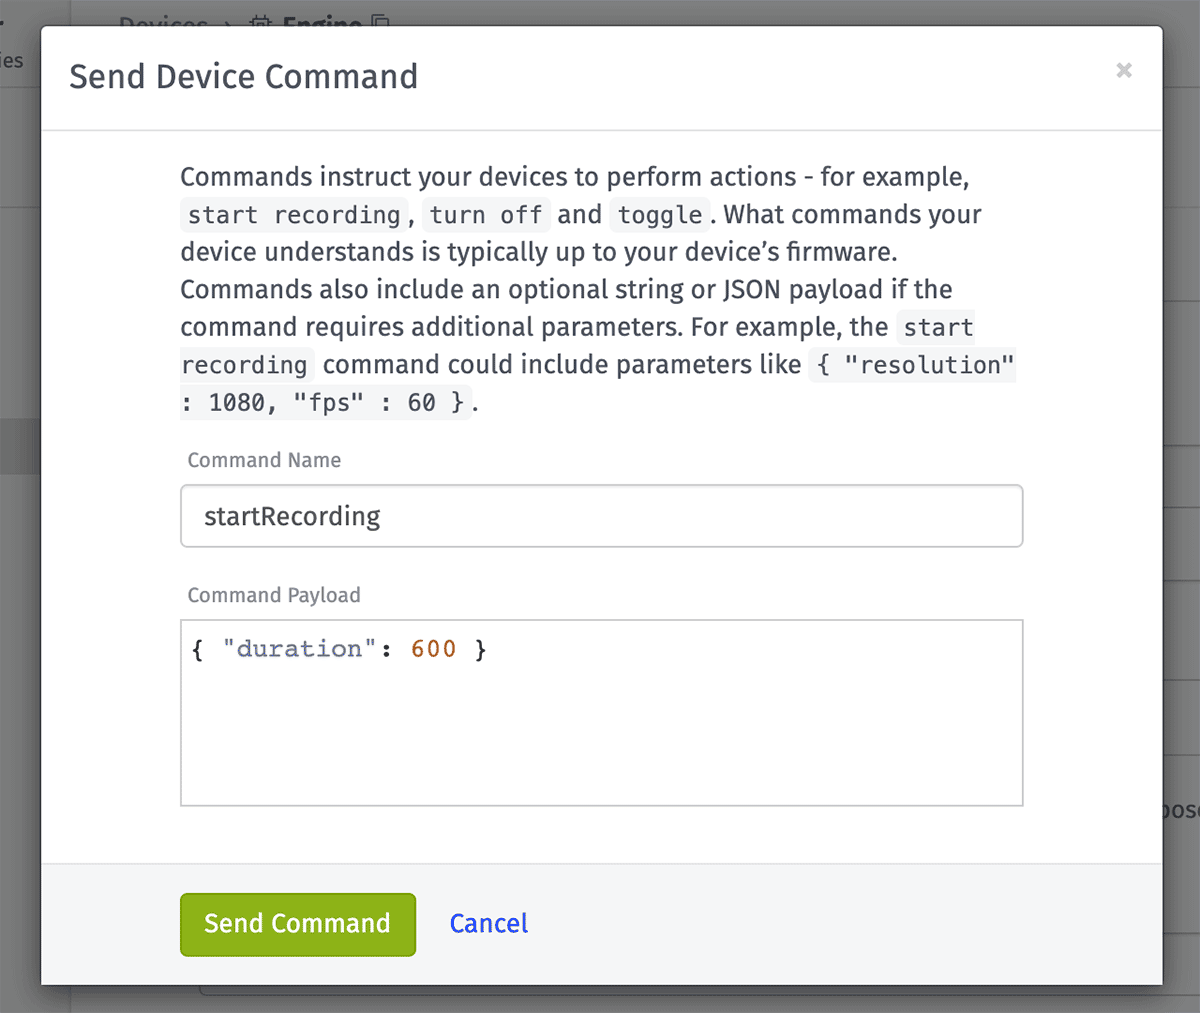
Notes:
- This option is not available for System devices.
- Commands may be sent to Peripheral devices, but the Gateway device associated with that peripheral must be subscribed to the peripheral’s command topic (
losant/THE_PERIPHERAL_ID/command). - The device must be connected to the MQTT broker at the time of submission to receive the command.
- A command sent to a device while it is disconnected from the broker will not be delivered to the device the next time it connects. The device must have an open connection to the MQTT broker at the time of submission to receive the command.
Force Connection Status
The Force Connection Status option allows you to manually set the connection status of your device to either “Connected” or “Disconnected”. When changing the status, there are several additional properties that may optionally be set:
- New Connection Status: Select either “Connected” or “Disconnected”. The field defaults to the opposite of the device’s current connection status (i.e. “Disconnected” when the device is connected, or “Connected” if the device does not have a current connection status).
- Event Time: Choose whether to use the current time or to set a specific time for the connection / disconnection event. Similar to reporting historical state or future state, connection status may be reported up to 30 days in the past or 24 hours into the future.
- IP Address: Optionally, enter an IPv4 or IPv6 address to associate with the forced connection status.
When setting a device’s status to “Disconnected”, there are three additional fields users may optionally set:
- Disconnect Reason: A custom message to associate with the forced disconnection.
- Messages From Client: A non-negative integer representing the number of messages received from the device by the MQTT broker.
- Messages To Client: A non-negative integer representing the number of messages sent to the device from the MQTT broker.
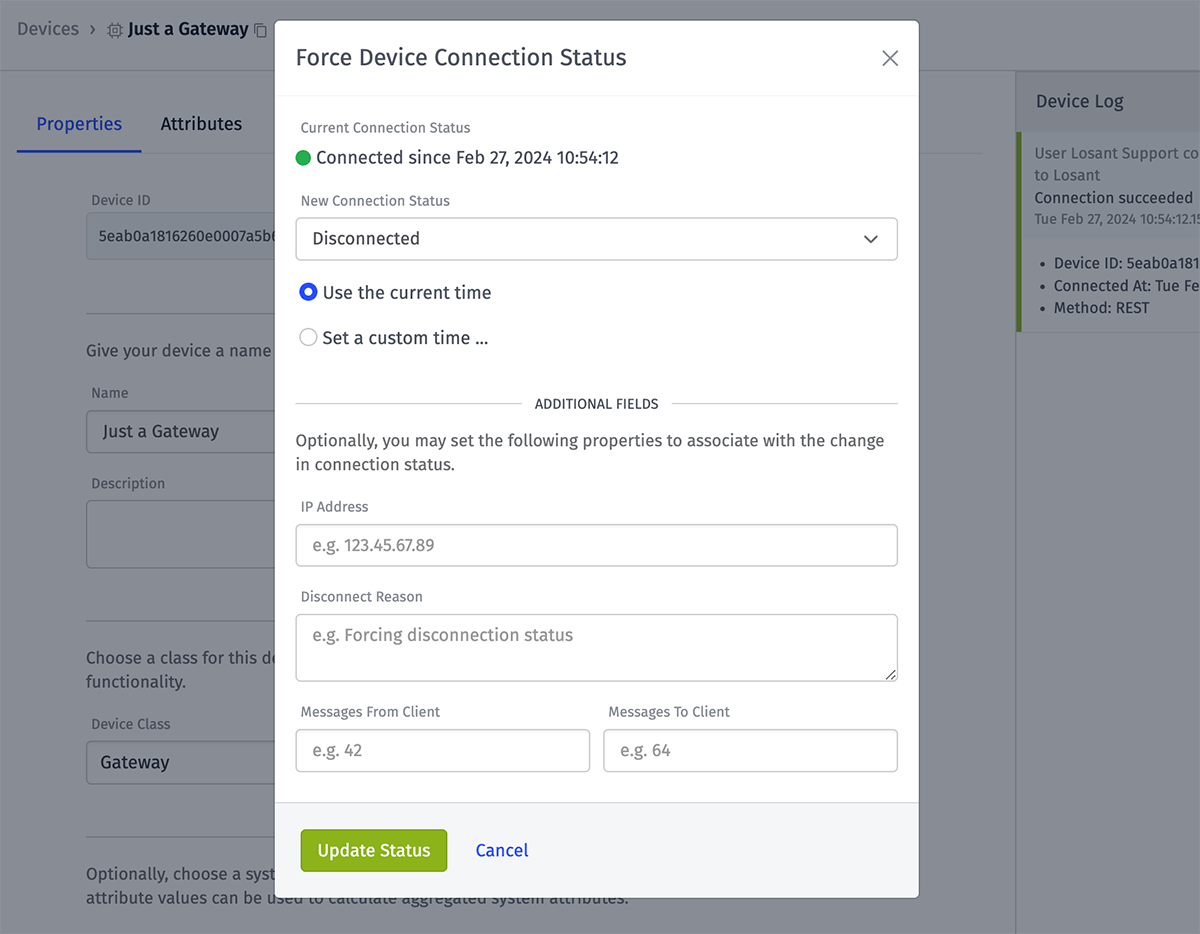
After submitting the form, the forced connection status will be available in the device’s live communication log and connection history.
Note: This option is not available for device classes that do not connect to the MQTT broker, such as Systems and Peripheral devices.
Request Data Export
You can request a CSV export of the state data that Losant has for your device. This will generate a CSV file of the state data for your device and send you an email when the generation is complete. The email includes a link that will allow you to download the generated file (the link is time-sensitive and will only work for 24 hours).
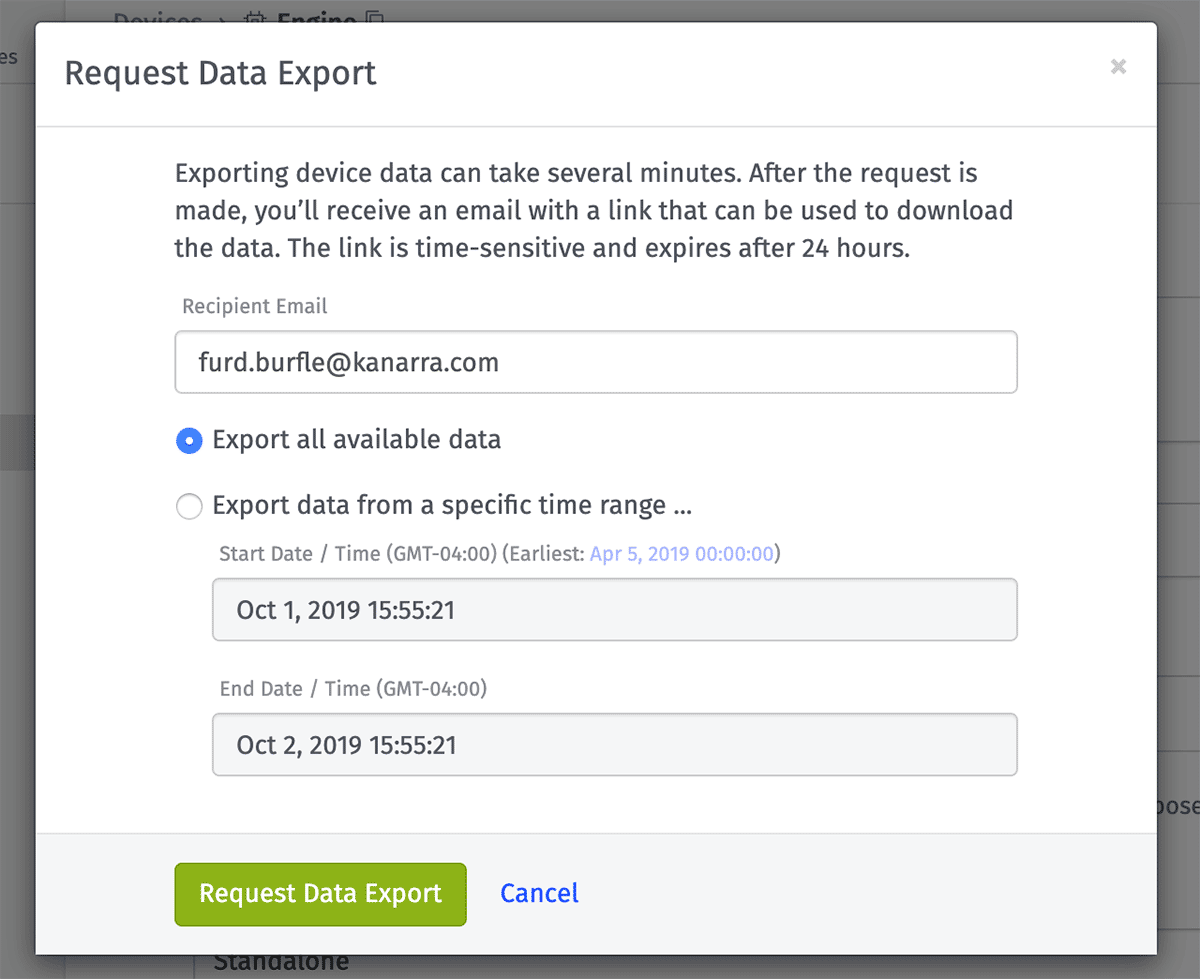
Enter an email address for where to send the data export (the default is your user email) and optionally choose a time range of the data you would like to receive (the default is all available device data).
The generated CSV will have a timestamp column (where the timestamp will be represented as milliseconds since epoch), an ISO Date column (where the time is represented in human-readable form), as well as columns for any attributes of your device. Each row will represent one reported state for the device. The following is an example export for a device with a “location” and a “temperature” attribute:
Timestamp,ISO Date,location,temperature
1467391295000,"2016-07-01T16:41:35.000Z","17.06025867,-18.96596512",25.2
1467391325000,"2016-07-01T16:42:05.000Z","15.44856967,-17.68055596",25.1
1467391355000,"2016-07-01T16:42:35.000Z","14.08786621,-16.61800051",25.2
1467391385000,"2016-07-01T16:43:05.000Z","12.58478405,-15.46545390",25.3
1467391415000,"2016-07-01T16:43:35.000Z","11.08683392,-14.33618457",25.3
Delete Data
If you would like to delete data stored against the device you may do so from the “Device Actions” dropdown.
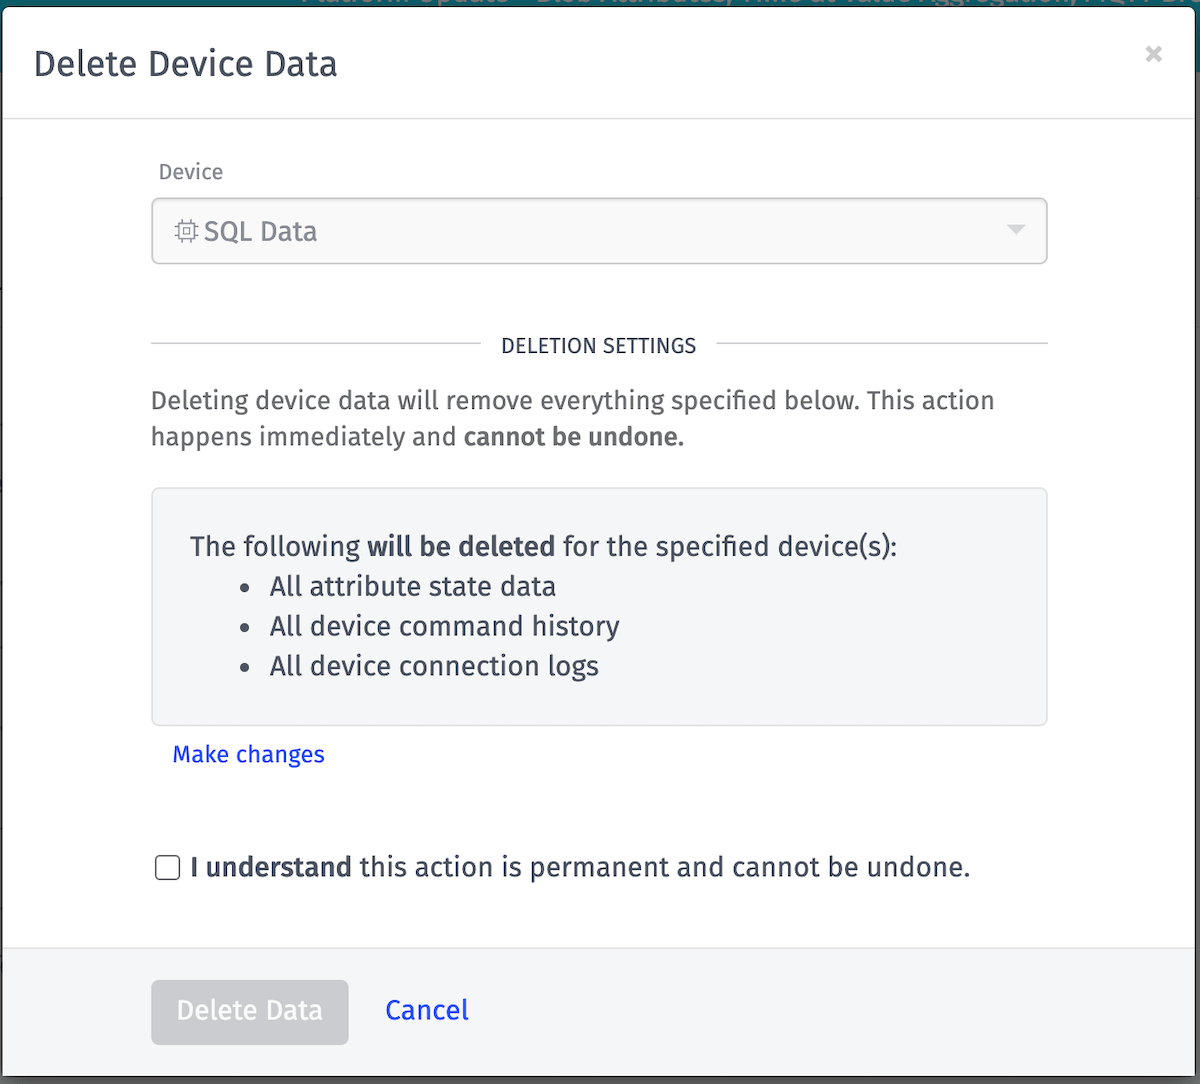
By default, this action deletes all data associated with the device. You have the ability to configure the deletion by selecting “Make changes”.
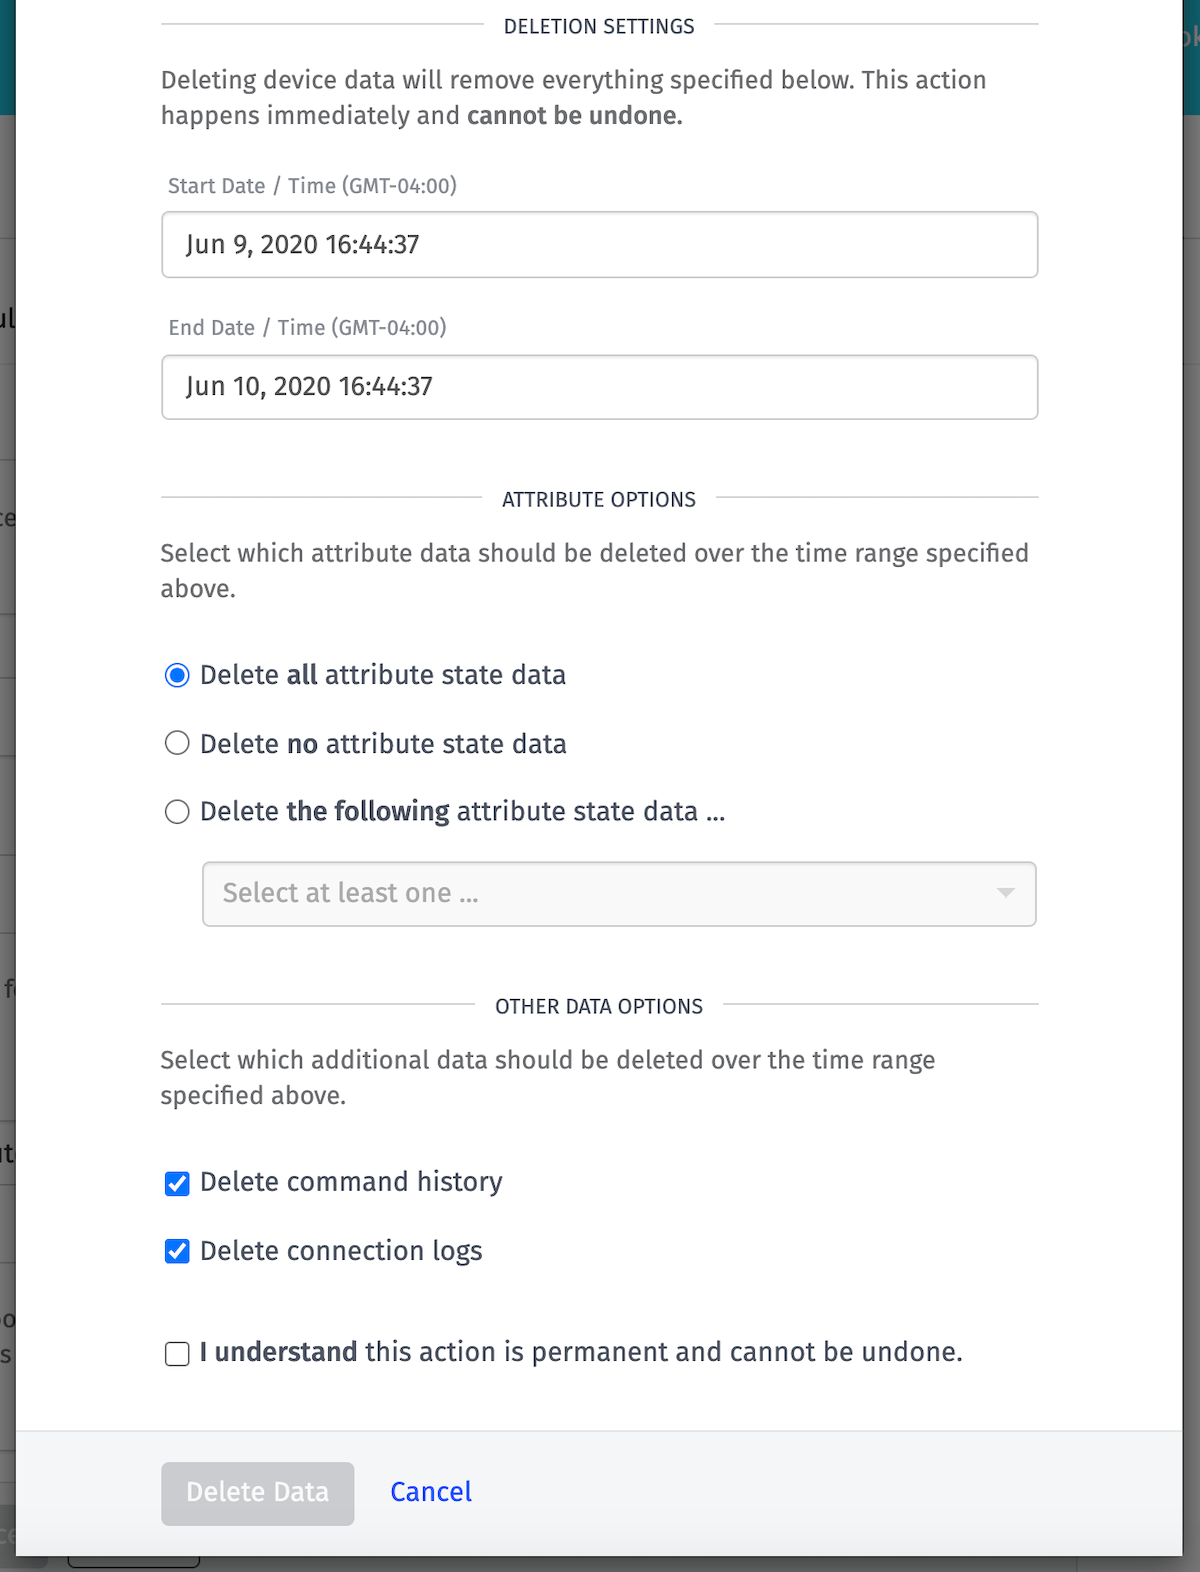
This advanced configuration allows you to define:
- A time range of device data to delete.
- Specific attribute data to delete.
- Whether to keep or delete the device’s command history (if applicable).
- Whether to keep or delete the device’s connection history (if applicable).
Create Access Key
To create an access key that will allow this device to connect to Losant’s MQTT broker, click the “Create Access Key” link This will display a modal with the new access key credentials and an option to download the access key as a file.
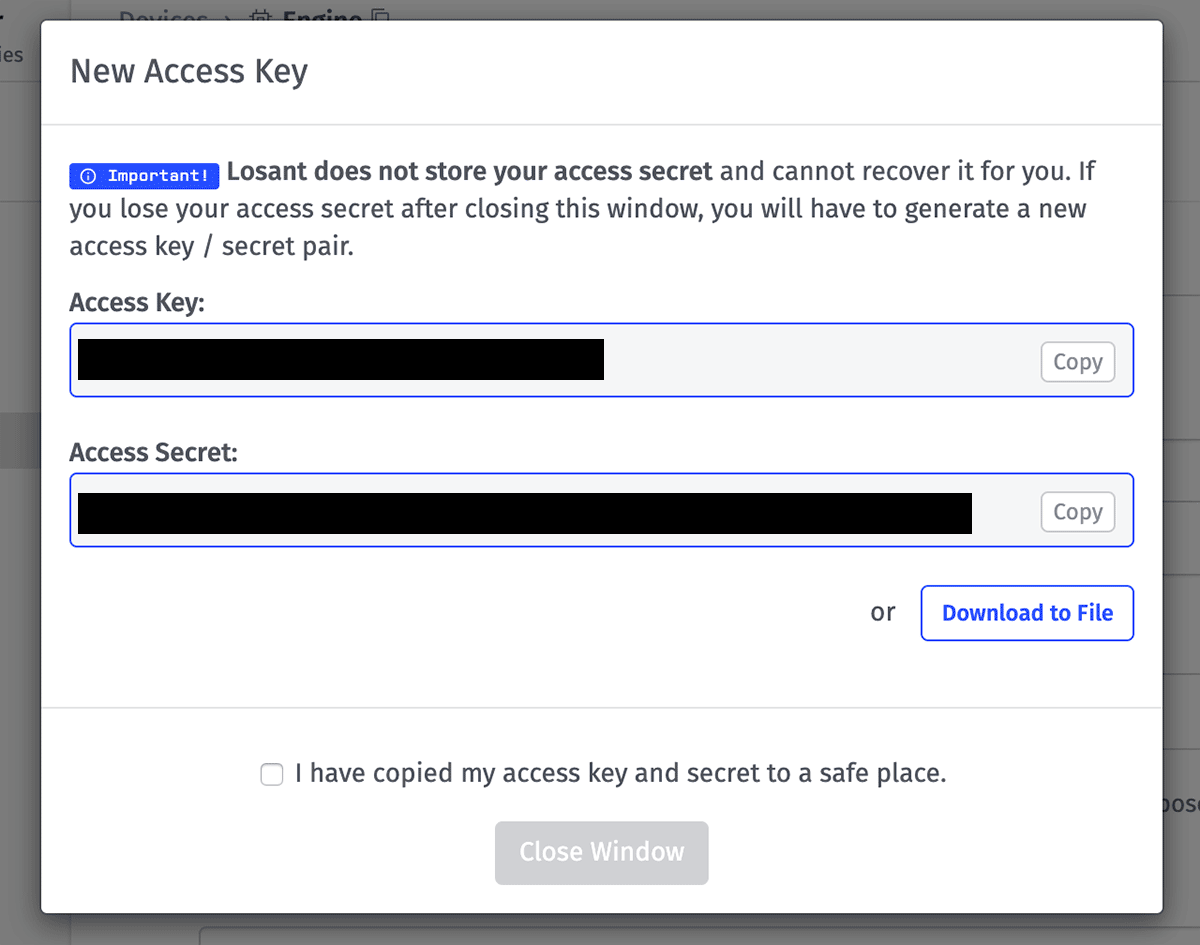
This access key will be scoped only to this device; it cannot be used to connect any other device to the broker.
Note: This option is not available for device classes that do not connect to the MQTT broker, such as Systems and Peripheral devices.
Clone Device
To create a new device with the same configuration as the current device, choose the “Clone Device” option from the dropdown. This will add a new device with the same configuration to your application and will redirect you to the new device, where you can make additional changes if desired.
Note: If you are cloning a System device, and the device has any attributes that are referencing specific devices, those devices will be removed from the configuration in the cloned device.
Convert to Recipe
You may also wish to convert your existing device to a device recipe in order to create a large number of devices with the same configuration. Click the “Convert to Recipe” option, and then you will be redirected to the newly created recipe.
Note: Just like with cloning a System device, any attributes referencing specific devices will have those devices removed from configuration before creating the recipe.
Download Agent Config File
The Download Agent Config File option allows you to download a sample TOML config file with the device ID in place. The config file can be used to set up an Edge Compute device and it documents all the options, including their environment variable counterparts. The config file does NOT include an access key and secret. You will need to generate and enter those in separately.
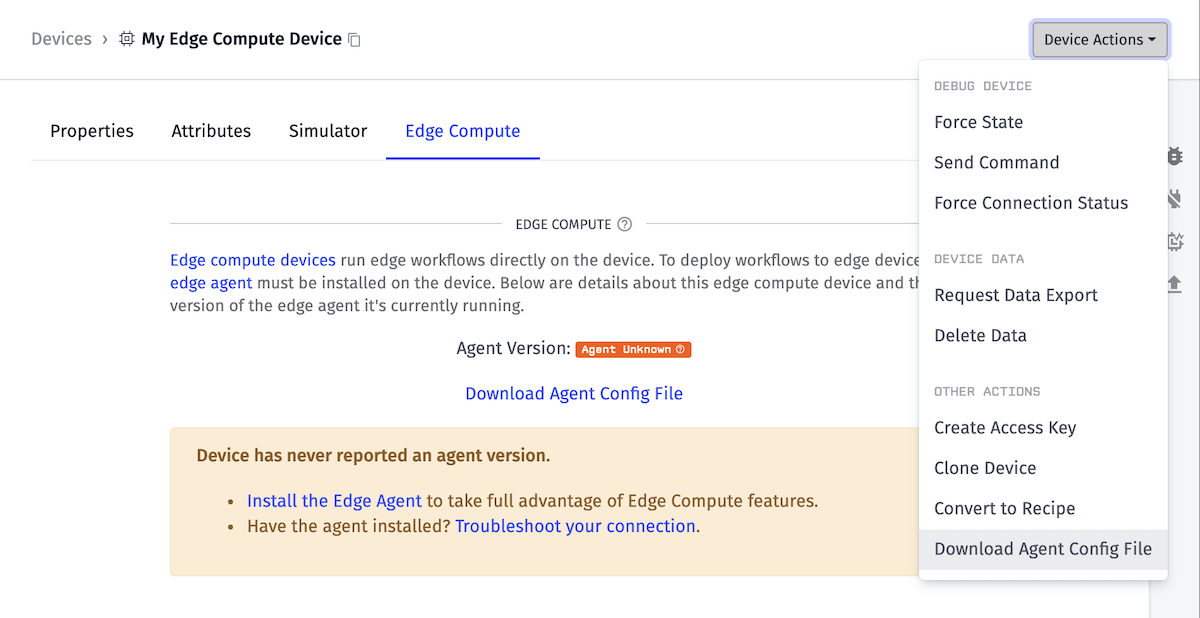
Note: This option is only available to Edge Compute devices. It can be accessed in the “Other Actions” dropdown or in the Edge Compute tab.
Request WASM Bundle
For Embedded devices, users may request an emailed WASM bundle file containing all of the Embedded Workflows flagged for deployment to the device. Users may then manually load this bundle onto their device.
Notes:
- This option is only available for Embedded devices.
- When taking this action and manually loading the bundle onto the device, Losant will not be able to track the deployment in the cloud platform. The bundle will be listed as an “Unknown Bundle” in the device’s deployment logs.
Deleting a Device
To delete a device, click the “Delete Device” button at the bottom of the “Properties” tab. This will display a modal requiring you to confirm the action by typing the device name.
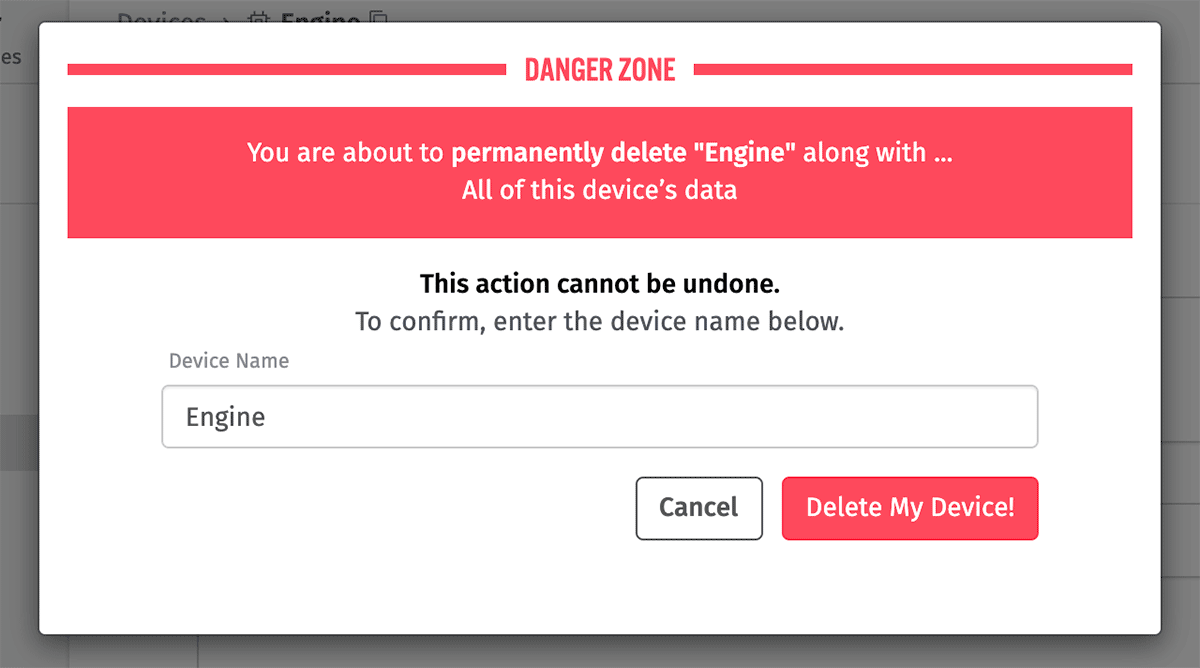
Deleting a device will also delete all data associated with the device. This action cannot be undone.
Exporting Devices
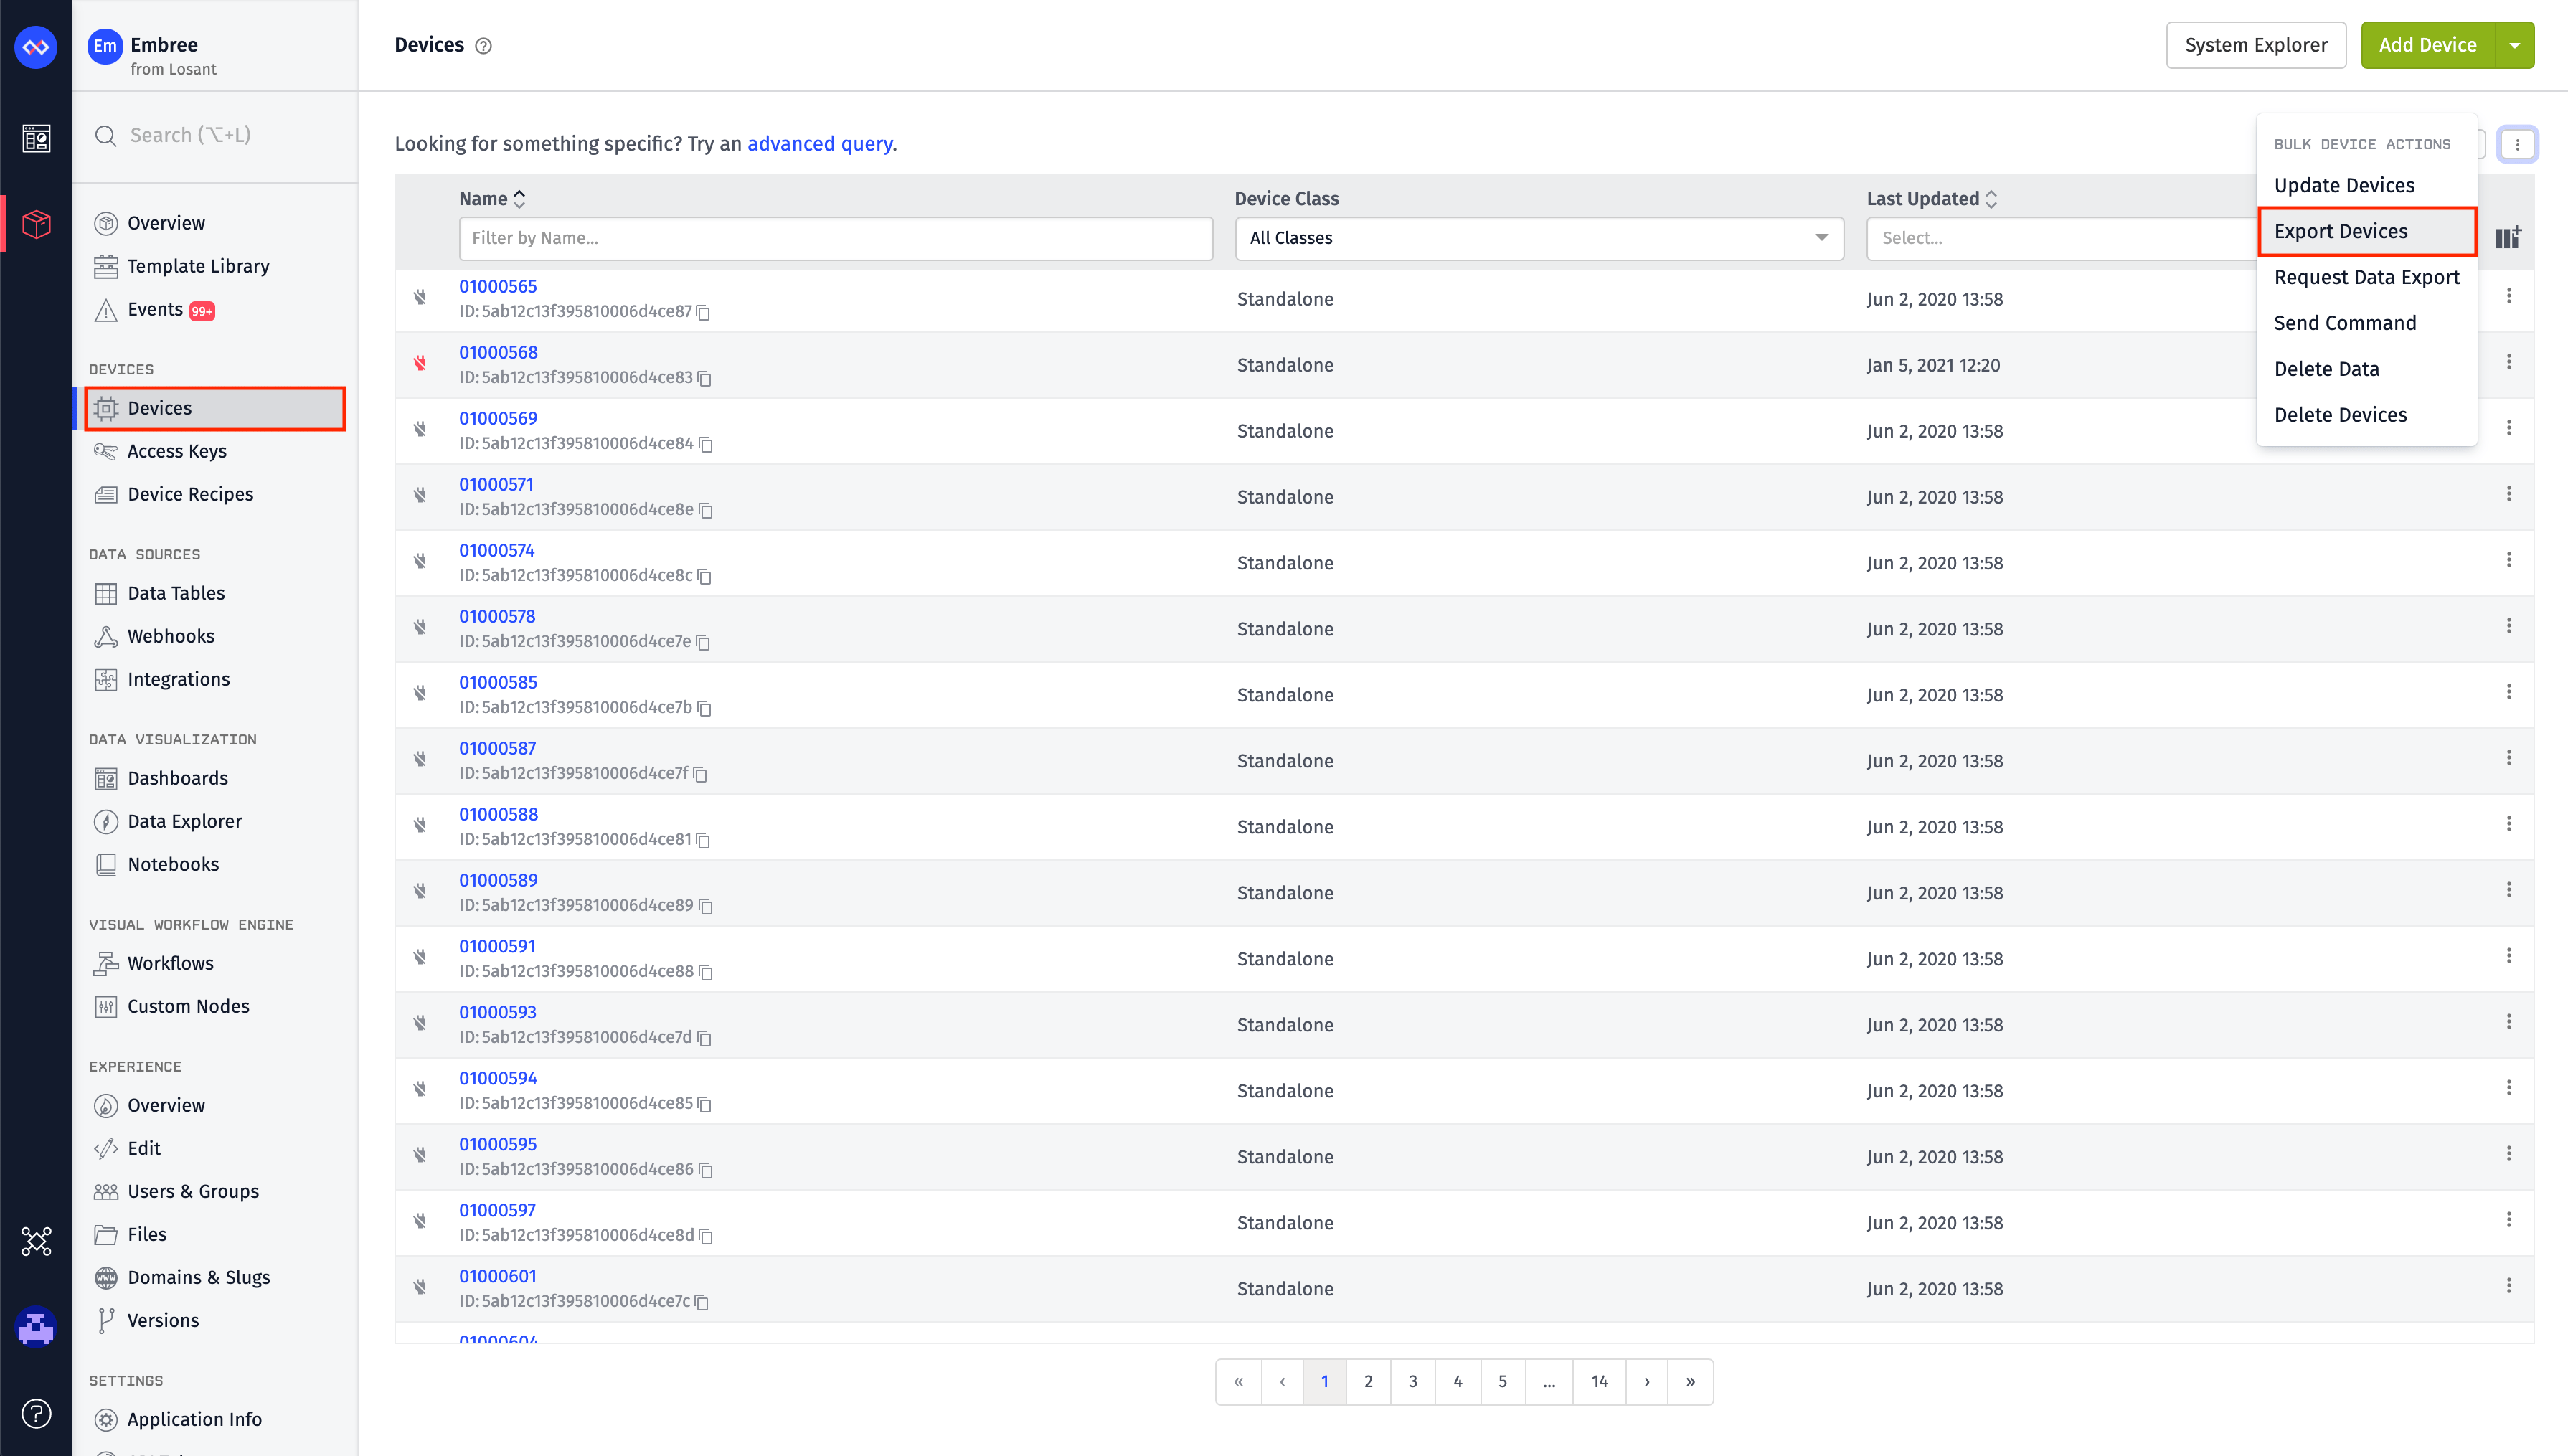
To export a list of devices scoped to an application, visit the “Devices” page and select the “Export Devices” item from the “Bulk Device Actions” dropdown menu in the top right corner of the list. This generates a CSV file of all devices in the application for download, which will be emailed to you after the export has completed. The CSV will include each device’s:
- ID
- Name
- Description (if applicable)
- Device Class
- Gateway ID (if applicable)
- Parent System ID (if applicable)
- Values for any tag associated with the device
Note: Device exports filter devices based on the advanced query applied to the devices list.
Was this page helpful?
Still looking for help? You can also search the Losant Forums or submit your question there.
